👋 Throughout the examples in this guide we use two fictional contractor workspaces: Bob's Company (Bob and his partner Alice, plus an employee named Marco) and Tom's Company (Tom solo, plus an employee named Sam). They show up whenever we need a concrete example of how a feature plays out across two organizations.
🚀 Getting started
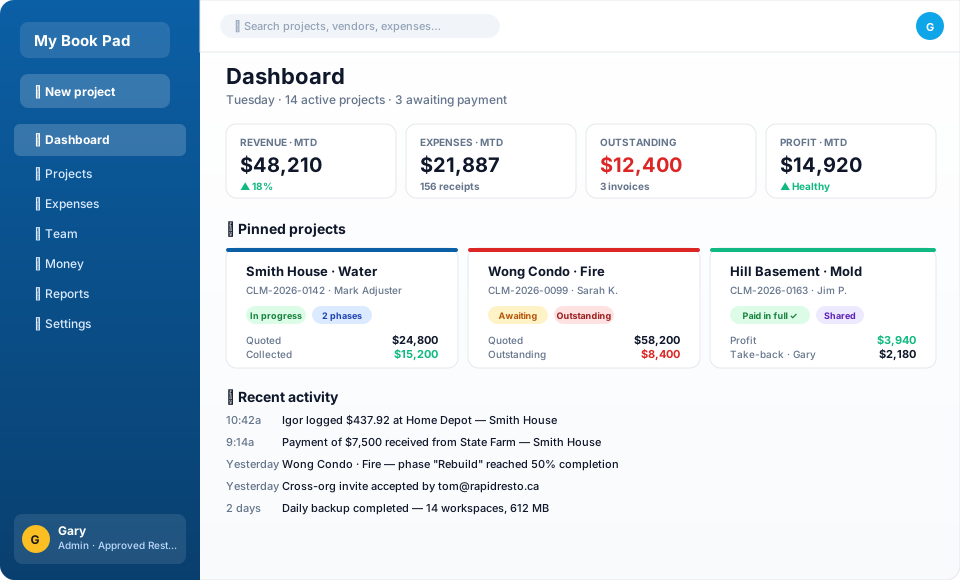
My Book Pad is a job ledger for restoration crews and general contractors. It tracks projects, expenses, employees, cross-org collaboration, and profit splits all in one place. Pick the right Project Type per job — Insurance for claim work, Retail for GC work — and the form adapts to fit.
Creating your workspace
- Sign up at mybookpad.com. Pick a workspace name (e.g. Bob's Company), a workspace ID (e.g.
bobs-company), your admin email, and a password. No credit card required. - Confirm your email. We send a confirmation link to the address you signed up with. Click it to activate the workspace — you'll be auto-logged-in afterward.
- Your 3-month free trial starts immediately. Every feature is unlocked — log expenses, run jobs, collaborate, settle up. We won't auto-charge anything.
Your first dashboard visit
The first time you sign in to a brand-new workspace, you'll see a welcome banner with three quick wins: create your first project, log your first expense, invite a partner workspace. It auto-hides once you've taken any action — or you can dismiss it with "Skip the tour".
Below the welcome banner, a setup checklist tracks the rest:
- ✓ Set your organization name
- ✓ Set the default tax rate
- ✓ Add your first client
- ✓ Create your first project
- ✓ Log your first expense
- ✓ Invite a teammate
- ✓ Invite a partner workspace
Work through it and it'll celebrate when you hit 7/7. Dismiss it anytime — it'll never come back for that workspace.
"What's new" tile
Near the bottom of the left sidebar, just above your avatar, there's a small v2.84.7 tile. When we ship a release you haven't seen yet, a soft pulse dot appears next to it. Click the tile to jump to the Changelog — the pulse clears once you've viewed it. The version number itself is always the build you're currently running.
🏠 Projects & phases
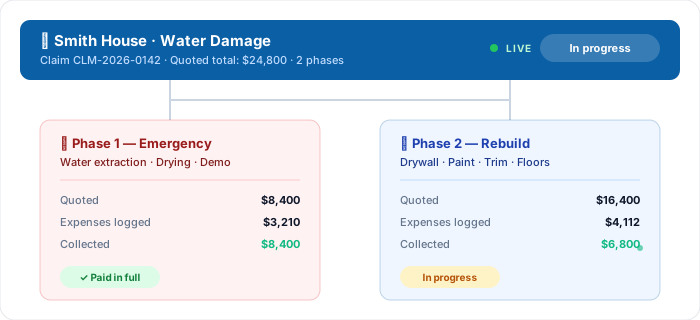
A project is one job — typically one address. Pick the right type when you create it:
- Insurance — has fields for claim number, deductible, adjuster, insurance company, date of loss. Use this for restoration / claim work.
- Retail — simpler form, just client + address + scope. Use for cash jobs or anything not insurance-driven.
Phases (Emergency + Rebuild)
Most insurance claims have two phases — Emergency (mitigation, drying, etc.) and Rebuild (reconstruction). Both bill separately but belong to the same claim. My Book Pad models this directly:
- Create the project with Emergency phase first.
- When the rebuild is ready to start, open the project and click + Add phase. Pre-fills client + claim info.
- Each phase tracks its own expenses, payments, and "paid in full" status. The claim group view shows them together with combined totals.
Statuses
A phase flows through these states:
- Pending — quoted/approved, work not started.
- Open — work in progress. Expenses can only be logged against open phases.
- Halted — paused (insurance dispute, weather, etc).
- Completed — work done, awaiting final payment.
- Archived — closed out and out of active lists, still searchable.
Paid in full
Each phase has a separate Paid in full toggle at the top of the project page (and on the Money tab). It's independent of status — useful when the insurer settles a phase before you've marked the work complete, or when you want to stop showing "outstanding" even though a small balance technically remains.
Example. Tom's Company quoted $10,000 for an Emergency phase but the insurer settled at $9,800 final. Tom logs the $9,800 payment, then clicks ✓ Paid in full. The math snaps: Collected jumps to $10,000 (the quoted amount), Outstanding goes to $0, profit recalculates, and the per-partner take-back row updates. Click again to revert.
Settling a phase
Once a phase is both Completed (work done) and Paid in full (money in), a Settle phase button appears on the Money tab, just left of Mark paid in full. It's greyed out until both are true. Clicking it settles the phase — the books close on it:
- The phase locks — no more expenses can be added, edited, re-scanned, or deleted.
- It's booked on the Settle-up page as done, so its take-back drops out of "what's still owed."
- The button flips to ✓ Settled; click again to un-settle (which unlocks the phase).
This is built for the insurance pattern where the insurer settles the Emergency phase well before the Rebuild is finished — you can close Emergency now and keep working Rebuild. Completed and Paid in full are independent on purpose: marking a phase paid in full no longer marks it Completed, because a client can pay in full while the crew is still on the job. Mark Completed yourself when the work is actually done.
Profit splits
For partner-run businesses, the org-wide default split (e.g. 50/50) applies to every project. Override on a single project under Settings tab → Profit split. Cross-org partners (other workspaces) take their share first; whatever's left is split among internal partners.
Change orders
The scope grew, the insurer approved a supplement, or the homeowner added a bathroom — that's a change order. On the project's Money tab there's a + Add change order button. Enter an amount, a short description (e.g. "Supplement #2 — added bedroom drywall"), and mark it Approved. From that moment on:
- The project's effective quoted total = original quote + sum of approved change orders.
- Progress bars on the dashboard and the Projects list re-base against the new effective total (so "75% paid" stays honest after a $5,000 supplement gets approved).
- The Paid in full snap-up uses the effective total, too.
- Pending change orders show up but don't move the math until you mark them Approved.
Old payments stay where they are — change orders only adjust the quoted side of the ledger. Delete a change order from the same Money-tab row if it was entered by mistake.
Project attention warnings (⚠)
Active project cards on the dashboard and rows in the Projects list show a small ⚠ chip when something needs your attention. Click the chip to see the popover with the actual reasons. Triggers include:
- Missing claim number on an Insurance project.
- No quoted total set (without it, "Paid in full" has nothing to snap to and progress bars can't calculate).
- Stale activity — no new expenses, payments, or notes for 14+ days on an open project.
- $0 expense rows — a receipt with no amount entered.
If you've reviewed the warnings and they're not actionable (e.g. you intentionally have no claim # for a retail-style job), admin or partner users can click Dismiss inside the popover. The chip hides for the whole claim group (root + every phase). New warnings appearing later will show the chip again.
🧾 Expenses & receipts
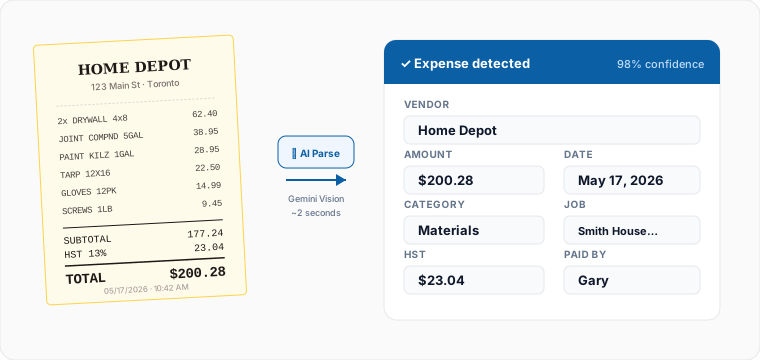
The fastest way to log an expense is from your phone:
- Tap the 📷 Scan button (bottom-tab on mobile).
- Pick the project this receipt is for.
- Tap the upload area → "Take photo" or pick from gallery.
- Wait ~3 seconds. Gemini reads the receipt and fills in vendor, subtotal, tax, total, date, and category.
- Confirm and save.
Paid by
Every expense is tagged with who paid for it. Employees default to themselves; partners can switch. This is the source of truth for the reimbursement flow below.
Mileage
Mileage is a special expense category. Log the date, project, and kilometers — the app multiplies by your org's per-km rate (set in Org settings) and tracks the dollar amount automatically. The CRA's current standard rate is a sensible default.
Billable flag
Mark an expense billable if you intend to invoice the cost back to the client. Reports break out billed vs. unbilled so nothing slips through.
Viewing a receipt photo
Click any receipt thumbnail (in the Expenses tab or the project's Files tab) to open the photo full-screen in a dedicated receipt viewer. Pinch-zoom and pan work natively on phones — no more squinting at a tiny preview. Hit the ✕ in the corner to return to whichever page you came from (the viewer remembers, so going "back" actually goes back, not out of the PWA).
How expenses are sorted
Two different lists, two different sort rules — by design:
- Project → Expenses tab sorts by the receipt date (the date printed on the receipt itself), newest first. This makes the per-job ledger read in true chronological order, which is what you want when you're reviewing a project's history or tying out a phase.
- Dashboard → Recent activity sorts by when the receipt was logged, newest first. This way a backdated receipt entered today still shows at the top of the feed — useful for catching "what did Marco just upload" even if the receipt itself is from last week.
Same data, two views. If you need to find a receipt by when it actually happened, use the project's Expenses tab. If you need to see what's just been added, look at the dashboard.
🏪 Vendors
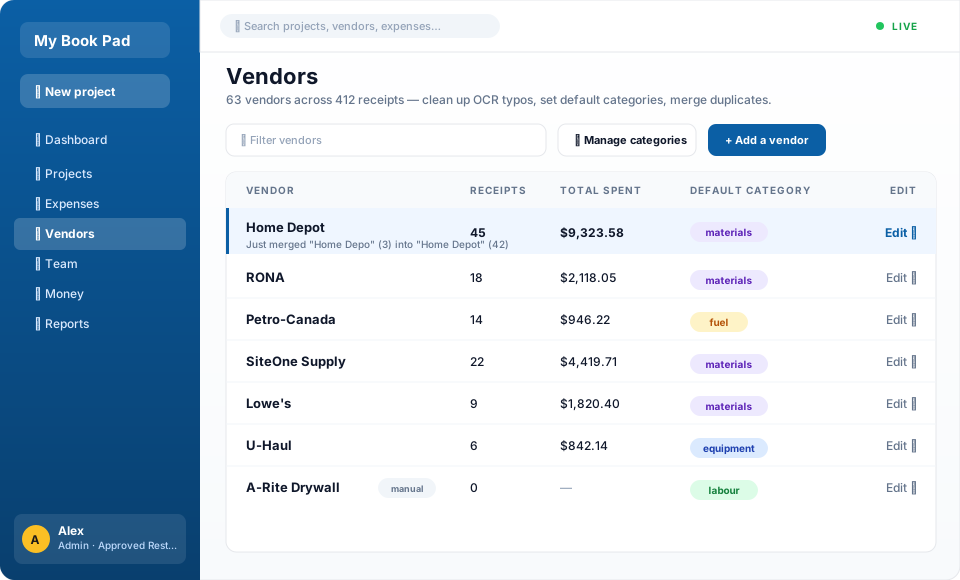
The Vendors page (sidebar nav, admin/partner only) is your org-wide cleanup station for every supplier, store, or contractor that has ever shown up on a receipt. The OCR reads vendor names off receipt photos, and it occasionally gets them wrong — "Home Depo" instead of "Home Depot", "Petro Canada" instead of "Petro-Canada", a misspelled brand name on a faded thermal slip. This page lets you fix all of that in one place.
Where the list comes from
Vendors are derived live from your expense rows — there's no separate "vendors" table to maintain. Every unique value in the receipts' Vendor column shows up here with three columns of context:
- # Receipts — how many expenses reference this vendor.
- Total spent — sum across every receipt, every project.
- Last used — the date on the most recent receipt.
- Default category — the category your past receipts at this vendor most commonly used (the same memory that auto-fills the category field when you log a new receipt from the same vendor).
Click any column header to sort. The filter box at the top narrows the list to vendors whose name matches your search.
The three actions
Each row has an Edit ▾ dropdown with three forms:
- Rename — type the corrected name, save. Every receipt that used the old name is updated to the new one across every project. Use this when the spelling is just wrong: "Home Depo" → "Home Depot" or "RONA INC" → "RONA".
- Merge into another vendor — pick an existing vendor from the dropdown, save. All receipts from the source vendor are reassigned to the target. Use this when the same supplier appears under two slightly different names that both already exist: "Home Depo" (3 receipts) merges into "Home Depot" (42 receipts), giving you one consolidated row of 45.
- Delete vendor name — the receipts themselves stay. Only the Vendor field is cleared on each one. Use this for nonsense OCR results that don't correspond to a real vendor (e.g. "THANK YOU COME AGAIN"). You can edit the vendor on those receipts individually afterward.
Example. Bob's Company has been logging Home Depot receipts for months. The OCR's confused half the time: "Home Depot" has 42 receipts, "Home Depo" has 3, "HD" has 1. Bob opens Vendors, clicks Edit ▾ on "Home Depo", picks "Home Depot" from the Merge dropdown, saves. He does the same for "HD". Now there's one clean "Home Depot" row with 46 receipts. The category memory tightens up too, since all 46 votes count toward the same vendor.
When NOT to use it
If only one specific receipt has the wrong vendor — for example the OCR mistook "Lowe's" for "Lows" on a single receipt — it's faster to open that receipt directly and fix the vendor field there. The Vendors page is for fixes that should apply to every receipt with a given name.
Adding a vendor manually
Most vendors arrive automatically — the OCR fills the vendor field on a receipt and they appear here on the next page load. But sometimes you want to pre-create a vendor: maybe you know you'll start ordering from a new supplier next week, or you want to set a default category before the first receipt arrives.
At the top of the Vendors page, click + Add a vendor. Enter the name and (optionally) pick a default category. The new vendor shows up in the list immediately with a small "manual" tag next to its name — it'll lose that tag the moment its first receipt arrives. Manual vendors with no receipts can still be renamed or deleted from the row's Edit menu.
Setting a default category per vendor
Each row's Default category column has a dropdown. Pick a category and it saves immediately. From then on, when anyone logs a receipt with that vendor, the category field auto-fills with your override — even before the OCR's historical guess kicks in.
The column shows a small badge so you can tell at a glance:
- override — an admin/partner has explicitly set this default. Wins over the historical guess.
- auto (muted, no badge) — no override; the default is the mode of past categories for this vendor's receipts.
- — none — — no override and no history; the category field starts blank when logging a new receipt.
To clear an override, pick — none — from the dropdown.
Managing categories (add, rename, delete)
Categories are shared org-wide — the same six built-ins (materials, tools, fuel, mileage, labour, other) ship with every workspace. Click ⚙ Manage categories at the top of the Vendors page to:
- Add a new category — type a name at the bottom of the panel (e.g. "permits", "equipment rental", "dump fees", "subcontractors") and save. Categories are normalized to lowercase, capped at 32 characters, and no duplicates allowed.
- Rename a category — click ✏ Rename next to any custom category to fix a typo in place. Saving cascades through every receipt that used the old name and every vendor's default-category override, so nothing is left pointing at a stale value.
- Delete a category — click 🗑 next to a custom category. The receipts using it stay (their amounts, dates, vendors are all preserved) — only the category field is cleared so you can re-tag them later. The same goes for any vendor that had this category as its default.
New categories show up everywhere: the receipt-logging form, the per-vendor default dropdown, the Tax page, and Reports. The six built-in categories are protected — they can't be renamed or deleted, so nothing existing in your books breaks.
Example. Bob adds a new category "Equpiment Rental" — then realizes it's misspelled. He clicks ⚙ Manage categories, hits ✏ Rename on the typo, fixes it to "equipment rental", saves. Every receipt Marco logged against the old spelling jumps to the new one. Bob's Money tab reports don't double-count, and nothing breaks.
Who can edit
Only admin and partner users see the Vendors entry in the sidebar. Employees and supervisors can still set a vendor on their own receipts, but they can't bulk-rename, merge, delete, add vendors, or add categories — the org-wide blast radius is reserved for finance roles.
💵 Reimbursements
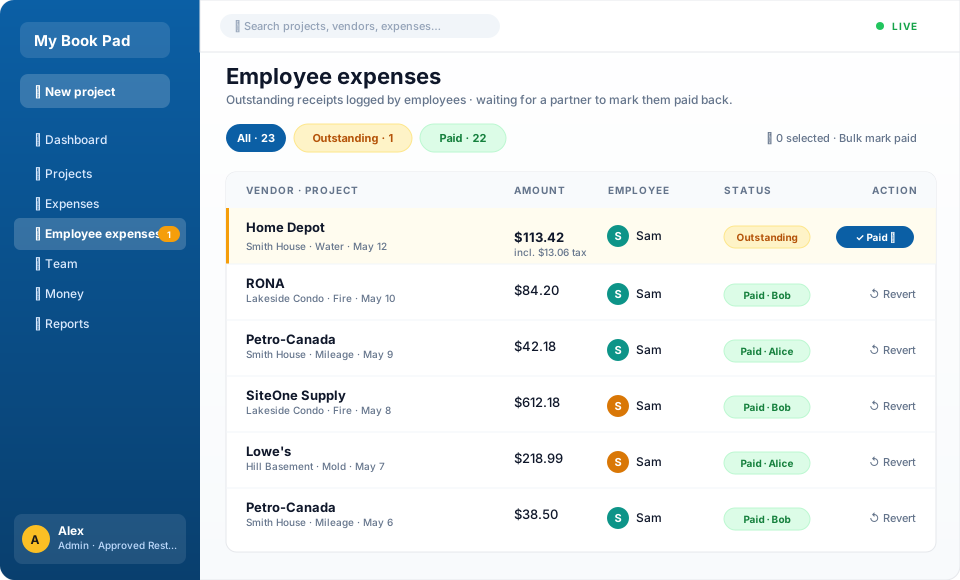
Reimbursements are the process of paying an employee back for receipts they covered out-of-pocket. The math behind who-took-what-slice-of-the-pie depends on getting this right, so every paid-back receipt must specify which partner reimbursed it.
The flow
- Marco (Bob's Company employee) logs a $113 Home Depot receipt against an active project — paid by Marco.
- The receipt shows as Outstanding on the project's Expenses tab and on the org-wide Employee Expenses list.
- Bob pays Marco $113 in cash. Bob opens the expense row, clicks ✓ Paid ▾, and picks Bob from the partner menu. (Alice would also show up here — Bob picks whoever actually paid.)
- The row flips to Paid · Bob. From now on the math attributes that $113 to Bob's "Cash laid out".
Two places you can do this
- Per-project — Project page → Expenses tab → row's ✓ Paid ▾ dropdown.
- Org-wide — Employee Expenses in the sidebar. Single-row picker or bulk-pick at the top for marking a batch at once.
Fixing a wrong partner
Clicked ✓ Paid ▾ and accidentally picked Alice when Bob actually paid? Open the ✓ Paid ▾ menu on that same row again — the current partner is shown with a ✓ mark. You can:
- Click a different partner — switches the attribution. The reimbursement date stays as-is (we only fix the who, not the when).
- Click the red ↺ Revert to outstanding at the top — clears the reimbursement entirely and the receipt goes back to Outstanding.
Why this matters. The per-partner take-back math (next section) attributes each reimbursed receipt to whichever partner actually wrote the cheque. If Bob covers $500 of Marco's receipts and Alice covers $300, they each get that amount credited back to them — plus their profit share. Picking the wrong partner shifts dollars from one to the other, so the fix-it dropdown matters.
🧾 Invoices
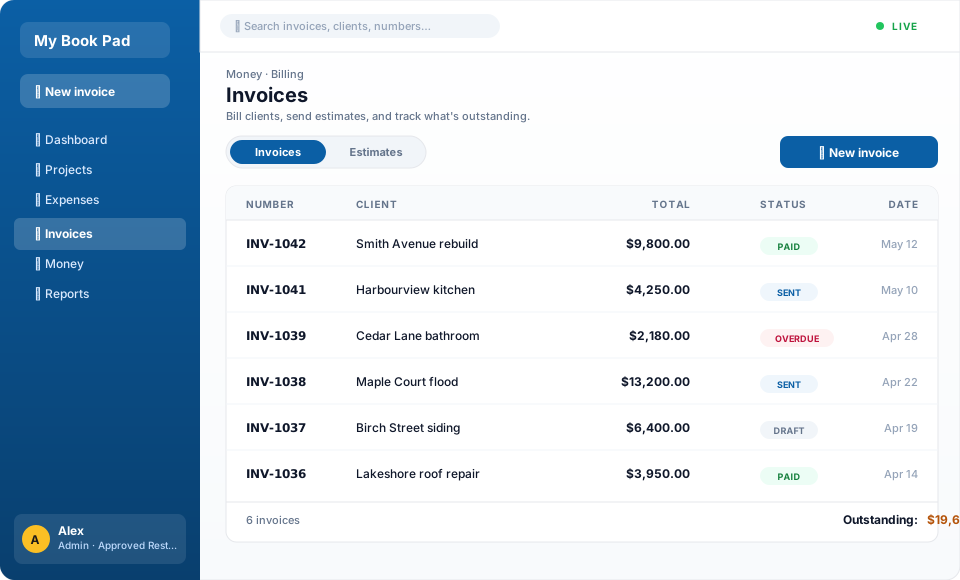
Build branded invoices and track them from draft to paid. An invoice can be attached to a project or stand alone for a quick direct-bill job. The Invoices item in the sidebar opens the list, with an Invoices / Estimates toggle, status filters, and headline figures for what's outstanding and overdue. Amounts on the list, on each invoice, and on estimates all show your currency symbol from Settings → Defaults → 🌍 Regional, so invoices read the same as the rest of the app — unless an individual document is set to a genuinely different currency code, which then shows its own symbol.
Who can use Invoices. Invoices are an Admin + Partner feature — employees and supervisors never see them. An Admin can also reserve Invoices for Admins only: Org Settings → Role visibility → Feature access has a “Partners can use Invoices” switch (on by default). Turn it off and Partners lose the Invoices nav item, the project Invoices tab, and access to every invoice page. Admins always have access.
Status & getting paid
Invoices move through Draft → Sent → Paid, and show Overdue automatically once a sent invoice passes its due date with a balance owing. Payments aren't entered on the invoice itself — there's one place for money, the project's Money tab. A project-linked invoice just displays its totals; you record and reconcile the actual cash in the Money tab and Settle-up, so nothing is double-entered. A standalone invoice has no project (and so no Money tab), so it gets a simple Mark paid / Mark unpaid button to close it out — no amounts to key in, just the status. Use Void to cancel an invoice without losing the record (it can be reopened), and Duplicate to copy one as a fresh draft.
Numbering
Invoices and estimates each have their own number series — set the prefix, next number, and zero-padding on Settings → Invoicing. You can also edit any individual document's number on its editor (it just has to stay unique).
✏️ The invoice editor
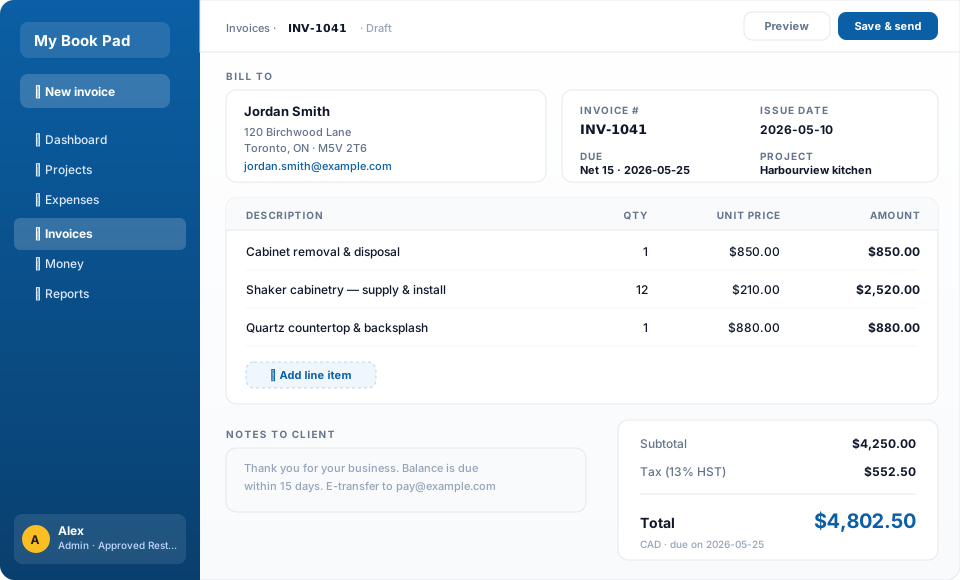
Everything on an invoice is editable: line item descriptions, quantities, unit prices, which lines are taxable, a discount (amount or percent), the tax rate and label, terms, dates, PO number, currency, notes, and a footer. A running subtotal / discount / tax / total updates live as you type. The tax label (HST, GST, VAT, Sales Tax — set the default on Settings → Invoicing) is a display choice only and never changes the math, and your Tax ID / Business Number prints on the document.
When you open an invoice that belongs to a project, it stays inside the project — the project's tab bar stays visible above the editor with the Invoices tab active, plus a back link to the project's invoice list, so you never lose your place. Standalone invoices and the client's public page open as their own full-width pages.
Creating from a project — whole job, a phase, or a milestone
From the Invoices list, New invoice opens a chooser: start From a project or build a Standalone one-off. From a project, pick the job, then choose what to bill — for an insurance claim, the whole project (both phases combined, each line labeled by phase) or a single phase (Emergency or Rebuild); for a retail job, the whole project or an individual milestone (milestones can carry a dollar amount you set on the project). Line items pre-fill from the estimate and approved change orders, with tax backed out so the line totals plus tax match the original quoted amount. A soft heads-up appears if the phase/milestone/project already has an invoice, but you can always proceed.
🧱 Estimates
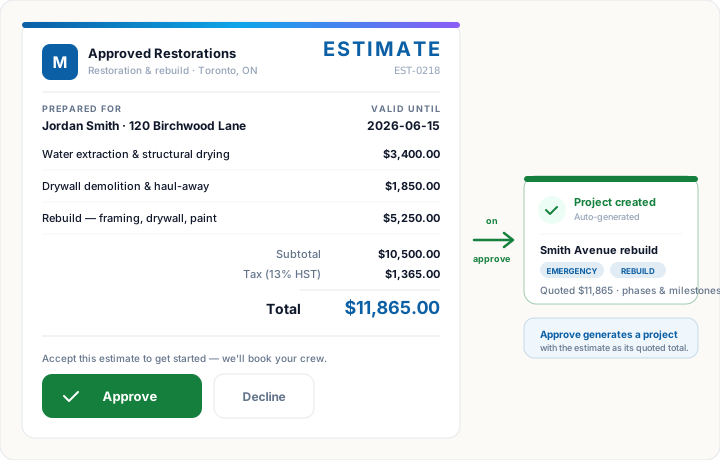
Estimates are the retail quote flow. Create one under Invoices → Estimates → New estimate, add line items and a client, then mark it sent. When the client agrees, Approve it — that automatically spins up a retail project from the same line items, seeding a milestone (with its amount) for each line, ready to invoice by-milestone. The estimate then reads Approved and links to the new project. Estimates use their own EST- number series.
🎨 Invoice templates
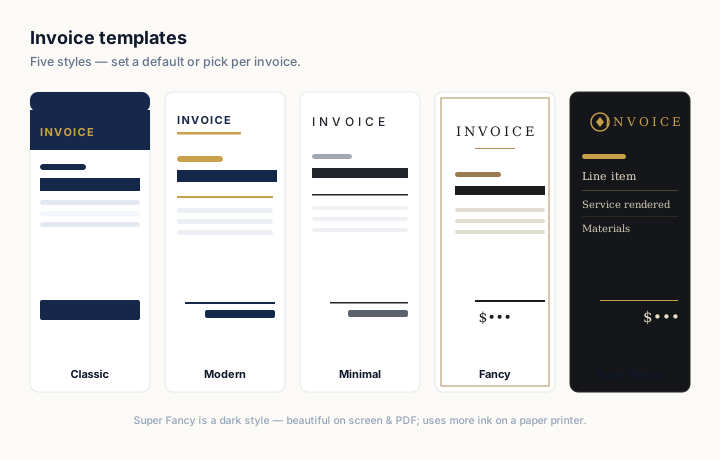
Choose from five looks: Classic (navy & gold corporate, with a full navy header band), Modern (a lighter navy/gold contemporary take), Minimal (refined, light, typographic), Fancy (editorial luxury with a gold-framed letterhead), and Super Fancy (a dark charcoal + champagne-gold showpiece). Set your default on Settings → Invoicing and preview a sample of each from there, or override the template per invoice from the Template dropdown on the editor (with per-document preview links). Every template carries your logo, business letterhead, tax registration number(s), currency, payment instructions, and footer terms.
A note on Super Fancy. It uses a dark background, so it looks stunning on screen and as a PDF — but printing it on a home or office printer lays down a lot of ink. For paper, Classic / Modern / Minimal / Fancy are the economical choices; reach for Super Fancy when you're emailing a PDF or sharing the on-screen link.
Which business name prints on the document
If your workspace operates under two trade names (set under Org Settings → Business → Your business), you can choose which one heads your invoices and estimates — the same idea as the Invite as choice on the client share. Pick the default under Settings → Invoicing → Business name on invoices & estimates, and override it on any single document from the Business name dropdown in the editor. This is a display/label choice only: it never affects totals, numbering, or your Tax ID. If you only operate under one name, this option stays hidden.
📧 Send & public link
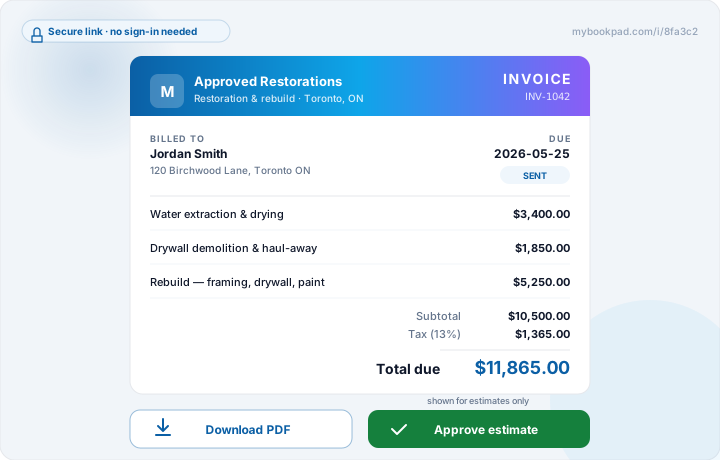
From any sent invoice or estimate, use Send to client to email it. The PDF is attached automatically once the PDF engine is installed on the server; otherwise the email includes a secure view link. Every document also has a public link (no login) where the client sees the branded document and downloads the PDF — and for retail estimates, an Approve button that generates the project. Insurance work uses invoices, which never show an approve button anywhere. Email delivery requires SMTP (or a working mail server) configured on the server.
🔗 Invoices on the portal
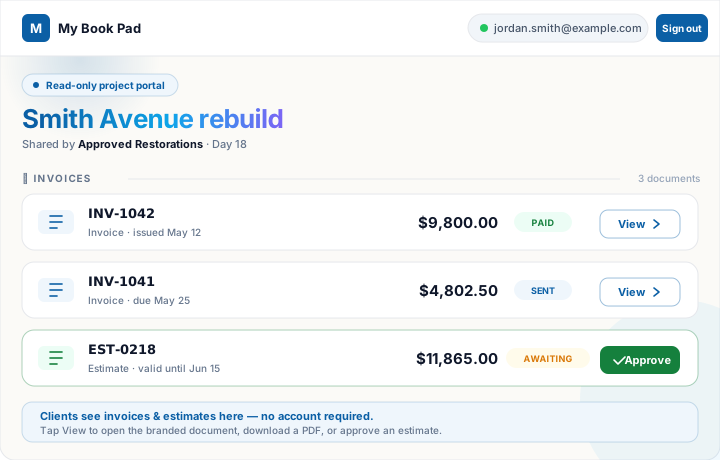
You can surface a project's sent invoices on its client-share portal: open the project's Client share tab and turn on the 🧾 Invoices visibility toggle. Only sent (non-draft) invoices appear, shown read-only with a View link to each one's public page. Drafts are never shown.
💰 Money & take-back
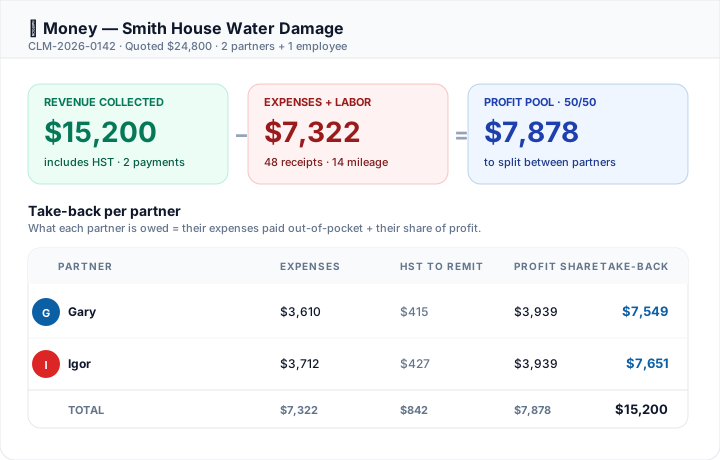
The Money tab on every project (and the Settle Up page) shows the slice-of-the-pie picture: what each partner walks away with from the job. The math is laid out so you can sanity-check every number.
The formula
For each partner on a project:
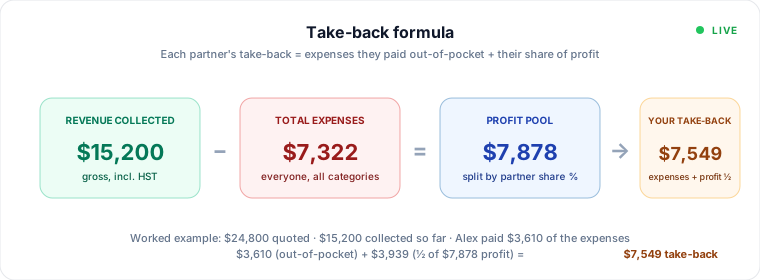
Take-back = Cash laid out + Profit share
- Cash laid out = receipts this partner paid for themselves plus employee receipts they reimbursed. Tax included. Hover the number to see the breakdown of own-receipts vs reimbursements.
- Profit share = (net revenue − marketing fee − total expenses) × this partner's split %. HST collected from the client is excluded because it's owed to the government, not profit.
- Take-back = the sum. The cash this partner literally walks out of the job with.
Worked example
Bob's Company (Bob 60% / Alice 40%) finishes an insurance job:
- Insurer paid $11,300 (= $10,000 net + $1,300 HST collected)
- Marketing fee: 0%
- Bob paid $300 of his own receipts
- Alice paid $200 of her own receipts
- Marco logged $500 of receipts; Bob reimbursed all of them
- Total expenses: $1,000
The math:
- Net revenue = $10,000 (HST is owed back to government, so it's not profit)
- Profit = $10,000 − $1,000 = $9,000
- Bob's profit share = $9,000 × 60% = $5,400
- Alice's profit share = $9,000 × 40% = $3,600
- Bob's cash laid out = $300 (own) + $500 (reimbursed Marco) = $800
- Alice's cash laid out = $200
- Bob's take-back = $800 + $5,400 = $6,200
- Alice's take-back = $200 + $3,600 = $3,800
- Combined take-back = $10,000 ✓ (matches net revenue)
Outstanding receipts
An employee receipt that hasn't been reimbursed yet doesn't count toward anyone's "Cash laid out" — the company owes the employee, but no partner has covered it yet. The receipt does still reduce profit (it's a real cost). Once you mark it ✓ Paid ▾ by a specific partner, it flips from "Owed to employee" into that partner's cash-laid-out total.
🏦 Payments & cheques
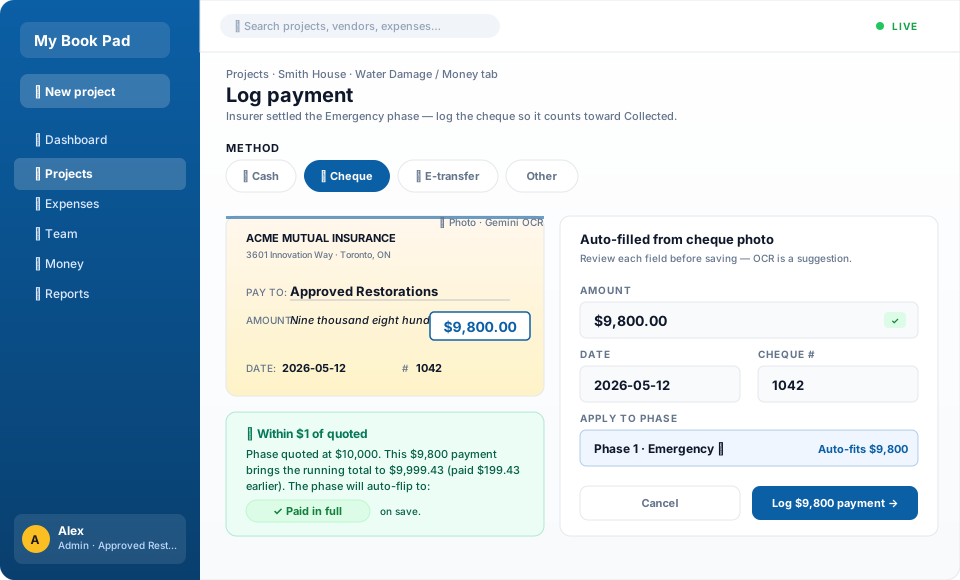
Payments are what the client (or insurer) pays you — separate from expenses, which is what you pay out. Every project has a Money tab with a Payments list and a + Log payment button.
Who can log payments. Only admin and partner users can add, view cheque images, or delete payments. Employees and supervisors don't see the Money tab at all — they handle expense receipts only.
Payment methods
When logging a payment, pick the method:
- Cash — straightforward.
- Cheque — unlocks an optional photo upload (see Cheque OCR below).
- E-transfer — for Interac and similar.
- Other — anything else (wire, credit card draft, etc.). Use the note field to describe.
The method is shown on each payment row in the Money tab, so you can see at a glance how the client has been paying.
Smart defaults — fewer clicks per payment
The payment form auto-picks sensible defaults so you usually just type the amount and hit save:
- Apply to: auto-fill ↧ is the default on multi-phase projects. The payment lands on the earliest phase with an outstanding balance, and any extra spills to the next phase in order. Pick a specific phase from the dropdown only when you need to override.
- Insurance projects default to 🧾 Cheque — most adjusters cut cheques, so the cheque-photo upload buttons (Take photo / From gallery) appear immediately, ready for the OCR pass.
- Retail projects default to 💵 Cash — direct-to-consumer renos are usually cash, e-transfer, or credit card, and cash is the most common starting point.
- Employees who don't have permission to see cheque photos get the same form without the cheque option — defaults gracefully to Cash.
Cheque OCR
When you pick Cheque as the method, a photo upload appears. Snap the front of the cheque from your phone and the same OCR pipeline used for receipts (Gemini Vision) reads the amount, date, and cheque number off the image and fills the form. You can edit any field before saving — OCR is a suggestion, not gospel.
- The cheque photo is stored privately and only visible to admin/partner users in the same workspace.
- Each saved cheque payment shows a View button that opens the photo full-screen.
- Delete on the payment row removes both the payment and the attached cheque photo.
Paid in full — automatic trigger
When your logged payments come within $1 of the project's effective quoted total (original quote + approved change orders), the phase auto-flips to ✓ Paid in full. This handles the common case where the insurer settles for a few cents short due to rounding or a deductible split. You can still toggle Paid in full off if you didn't intend it.
Example. Bob quoted a phase at $10,000. The insurer ultimately pays $9,999.43. Bob logs the e-transfer for $9,999.43 — within $1 of $10,000, so the phase auto-marks Paid in full and "Collected" snaps to $10,000 in the math. No manual click needed.
🤝 Cross-org collaboration
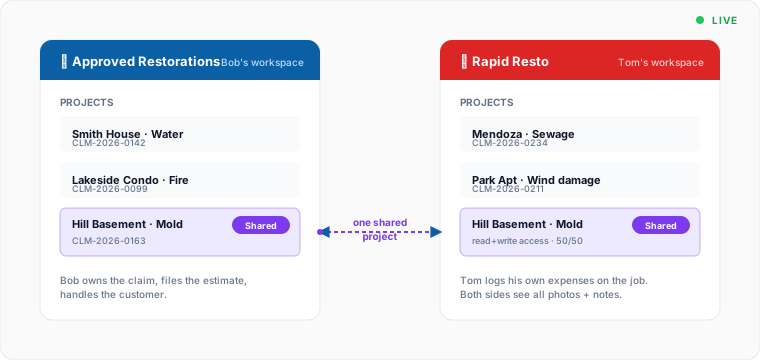
Sub out part of a job to another contractor who also uses My Book Pad — without giving them access to your whole workspace.
Walkthrough — Bob subs Tom in on the rebuild
Bob's Company landed a fire-restoration claim. The Emergency phase is theirs alone, but the Rebuild is bigger than they want to handle solo. Bob brings Tom's Company in on the Rebuild phase at a 60/40 split (60% Bob's, 40% Tom's, since Bob brought the client).
- Bob opens the Rebuild project. On the Overview tab there's a Collab card. He clicks + Invite a partner workspace.
- In the form: pastes Tom's workspace code (e.g.
toms-company) → split 40% → optional note ("You handle the drywall + paint, I keep the claim management") → Send. - Tom signs in to his own workspace and sees a sidebar badge ("New collab invite"). He opens it, reviews the terms, clicks Accept.
- Both workspaces now show the Rebuild project tagged with a ↔ Shared pill. Tom can log expenses, notes, and photos against the project from his side.
- Bob's view of the project shows Tom's expenses with a ↔ partner badge so it's obvious which side logged what. Tom's view is symmetric.
Two scopes
- Per-project — share just one specific project. Use this for one-off subbing arrangements.
- Workspace-wide — share every current and future project automatically. Use this when Bob and Tom have an ongoing partnership and want all jobs to be split by default.
Data ownership
Each workspace writes to its own database. When Tom logs a receipt against a shared project, that receipt lives in Tom's workspace — Bob's view reads it through the collaboration link. If Bob revokes the collab, Tom's receipts stay in Tom's workspace; Bob just stops seeing them. Same in the other direction.
Either side can revoke at any time from Org Settings → Partnerships. Revoking immediately hides the project on the other side.
🔗 Client share portal
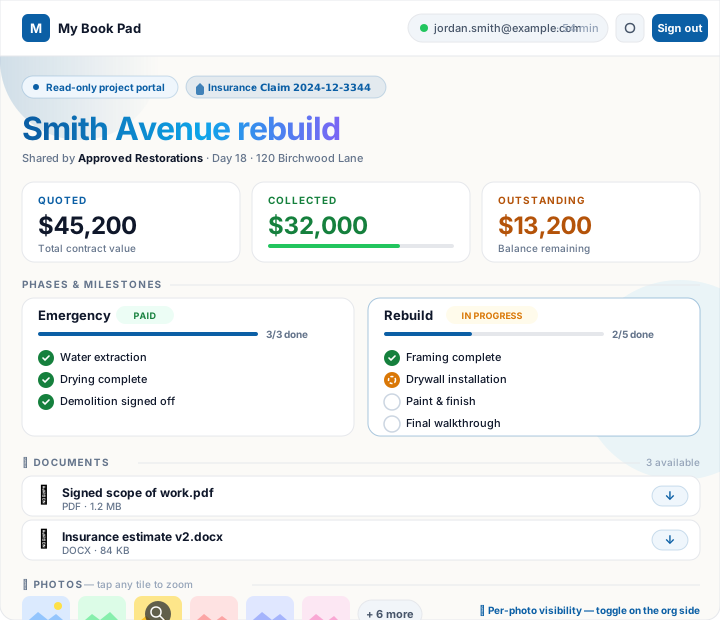
Send adjusters and homeowners a secure, read-only link to a project — they can see progress, photos, money, and milestones without ever logging into your workspace. Every share is gated by a one-time email code so the link can't be forwarded around.
Walkthrough — Bob shares the Smith Avenue rebuild with the homeowner + the Acme Mutual adjuster
- Bob opens the Smith Avenue project, clicks the 🔗 Client share tab, and hits Generate share link. A unique URL is created.
- The first config block is Project manager — Bob picks whoever should be the on-point name + phone number the client sees. Defaults to whoever created the link.
- Bob adds two emails to the allow-list: the homeowner (
alex@example.com) and the Acme Mutual adjuster (pat.lee@example.com). The homeowner's email auto-prefills from the project's linked client record. - Bob toggles which sections the client sees on the What they can see grid — for this share, he hides change orders (still being negotiated) but leaves Money, Phases, Photos, and Contacts on.
- He clicks ✉ Send invite to everyone. Each address gets a branded email with the project name, claim #, address, and a View project button.
- When Alex opens the email and clicks through, she lands on a portal showing the contractor's logo, the project name, and an email gate. She types her email, gets a 6-digit code emailed to her, and lands on the read-only project view.
- Her session lasts 1 hour. The session-expiry timer is live in the top nav. When it hits zero, a soft modal appears asking her to sign in again — her session can't be hijacked by sharing the URL.
What the client sees
- Hero with project identity. Project name in big gradient type, claim number fused into the Insurance tag at the top, address, insurer, and date of loss in a meta row.
- Money tiles. Quoted / Collected / Outstanding, with a progress bar showing % collected. Each insurance phase also shows its own quoted / collected / outstanding strip inline — Emergency vs Rebuild breakdowns are visible at a glance.
- Phases & milestones. Expandable cards per phase. Inside each, a checklist of milestones with status icons (○ pending, ⏳ in-progress, ✓ done) and completion timestamps.
- Documents. Files you uploaded under the project's Files tab and flagged client-visible appear here as a tap-to-download list — each row shows a file-type emoji (📕 PDF, 📘 Word, 📗 Excel, 🖼 image), the label or filename, file size, and a download chip. Pulls across the whole phase chain so a document uploaded on Emergency or Rebuild surfaces on the same share link. Admin gates the section with the Show documents toggle on the Share tab.
- Photos gallery — tap any photo for full-screen. Project photos in a grid (admin gates this with the Show photos toggle). Click or tap any tile to open it in a focused, full-screen viewer with prev / next arrows, a 1-of-N counter, swipe gestures on mobile (left/right to navigate, down to dismiss), and Esc / arrow-key support on desktop.
- Per-photo visibility. On the org-side photo grid, every tile has a 👁 / 🚫 eye-toggle in the corner. Click to flip an individual photo between "show on share" and "hide from share" — useful when most of a job's photos are client-friendly but a few internal damage shots shouldn't leave the office.
- Approved change orders. Approved-only — drafts stay hidden.
- Contacts. Project manager card with a tap-to-call CTA + adjuster card (name, phone, email) for insurance projects.
- Dark mode + theme toggle. Sun/moon button in the nav. Persists across visits via localStorage.
Security model
- Email allow-list. Only addresses you explicitly add can request a code. Anyone else hitting the share URL gets an explicit "this email doesn't have access — ask the contractor" error.
- One-time 6-digit codes. 10-minute window, single use. Resend invalidates the previous code.
- 1-hour rolling session. Activity extends it. Inactivity expires it. A live JS timer counts down in the nav.
- Read-only. The client can't edit, add, or delete anything — they only see what the visibility grid permits.
- Revoke anytime. Hit Revoke share link in the Danger zone on the Share tab — everyone is signed out immediately and the URL stops working.
- Auto-retires when the job is done. A share link goes read-only on its own 30 days after the whole claim is settled — see below. You don't have to remember to revoke it.
When the job is done — the link retires itself
You don't have to babysit old share links. Once a claim is fully settled (every phase has been marked settled on Settle-up), a 30-day grace window starts. When it elapses, the share link automatically goes read-only: the client lands on a friendly “This project is complete” page with a ✓ check, and the shared photos and files stop serving (the direct links 403 too). The grace window is there so the homeowner or adjuster can grab anything they still need before it closes.
- It keys off Settled, not Completed. Flipping a project's status — even marking it Completed by accident — never cuts off client access. The countdown is tied purely to settlement, so a mis-click can't lock a client out mid-job.
- Un-settling revives the link. If you re-open the claim by un-settling it on Settle-up, the link goes live again and the client sees the full view once more. Re-opening only the status does not revive it — the settle date persists, so the link stays closed until you actually un-settle.
- Want it dead sooner? Use Revoke share link in the Danger zone for an instant cut-off — that doesn't wait for the 30 days.
Multi-DBA: invite as a different brand
If your workspace operates under two trade names (set under Org Settings → Business → Your business), the Share tab shows an Invite as dropdown next to Send invite to everyone. Pick which DBA the client sees on the invite email and on the share page hero. Useful when an insurance restoration shop also operates a retail/renovation brand and wants the right one in front of each client.
Example. Pat Lee (Acme Mutual adjuster) lands on the share link, enters their email, types in the 6-digit code, and sees a clean read-only view of the Smith Avenue rebuild — exactly the same money + milestone progress Bob sees internally, but with no controls to edit anything, no employee receipts, no internal notes, and no profit splits. She closes the tab. An hour later her session auto-expires. She can ask for a new code any time the link is active.
✍️ E-signature documents
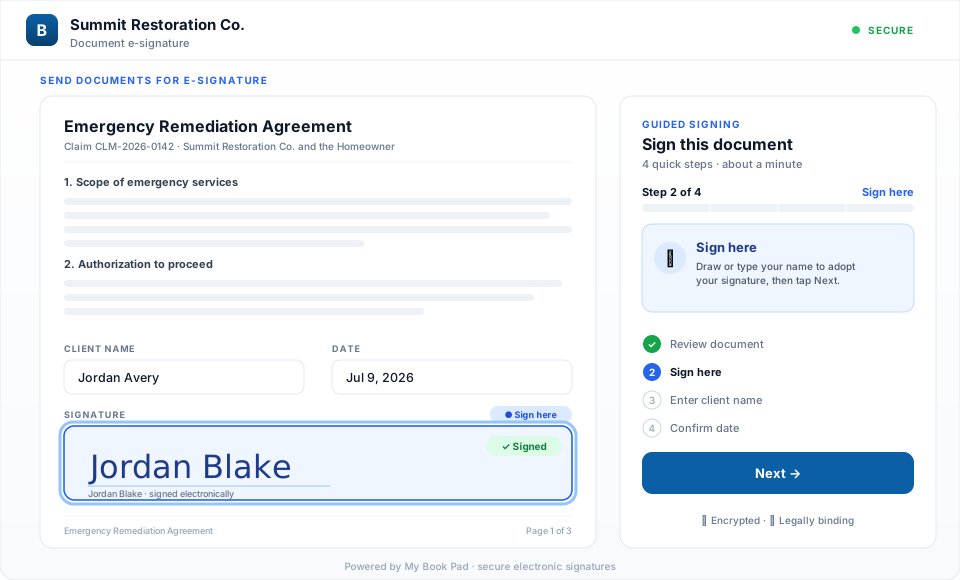
Send a client your paperwork — work authorizations, payment agreements, scope sheets — and have them sign it right on their phone: no printer, no app, no login. You upload each form once as a template and drop signature / initials / date / text fields onto it; from then on any client can be sent that document in one click. Once every required document is signed by everyone, the job can spin up into a real project automatically.
Set up a document template (once)
- Go to Org Settings → Documents and upload a PDF of your form (e.g. an Emergency Remediation Agreement). Give it a name and a type.
- Click ✎ Place fields to open the drag-and-drop editor. Your PDF renders on screen; drop Signature, Initials, Date, and Text fields wherever the client needs to sign or fill in.
- Click any field to open its settings: name it (e.g. “Phone number”), choose who fills it (Client, Your company, or Both), mark it required or optional, and set what it accepts (letters, numbers, phone, email, or anything).
- Save. The template is reusable forever — you never place those fields again.
Send it to a client
- Open the client record and find the Documents for signing section. Tick the templates to send, flag which are required, and pick the rep + which business name they see.
- Hit Send for signing. The client gets one email with a single secure link — even if you send several documents it's one “envelope,” not a pile of separate links.
- Track each document's status live: Sent → Viewed → Signed. Resend or Cancel any time.
What the client sees
- A clean, branded page with your logo — no My Book Pad account needed. They read the document first.
- A guided walk-through. They tap Begin signing and the wizard walks them to each field one at a time — sign once and it fills every signature and initial spot, dates auto-fill, and text fields prompt with the name you gave them and the right keyboard.
- Consent + a record. At the end they check the electronic-signature consent box; the signature, their name, the time, and their IP are recorded for your audit trail. The time is captured in the signer's own local time and timezone (not the server's), so it reads exactly as the clock in front of them.
- Light or dark. A toggle in the corner lets them read whichever is easier on their eyes.
Your company counter-signs
Some documents need your signature too. When a field is assigned to Your company, the document waits after the client signs and you get a ✍ Finalize button to add your signature. A document is only finalized once every party has signed. There's also a Shared field type (for things like a scope-of-work box) that the client fills and you can adjust before finalizing — make it a tall box and it holds a full multi-line paragraph that wraps neatly inside its bounds.
From signed paperwork to a live project
When you send documents you can name a proposed project. Once all the required documents are finalized, that proposal appears ready to Start project — one click turns it into a real project, and the signed PDFs are automatically attached to the project's Files. The client is emailed their signed copies once everything is complete.
Example. Bob sends the Chen family a work authorization + a payment agreement in one link. Maria opens it on her phone, reads both, taps Begin signing, signs once, and she's done in under a minute. Bob gets a notification, hits Finalize to counter-sign the payment agreement, and the “Chen — water damage” proposed project is one click from live — both signed PDFs already in its Files.
Change orders the client signs off on
Mid-job scope changes get the same treatment. On a project's Money tab, under Change orders, enter the extra scope and amount and click Send for client sign-off. The client gets an emailed link (also on their client portal) to review and approve or decline — no login. Crucially, the amount is added to the project's quoted total only once they approve: until then it's invisible to the quote, outstanding, profit, and partner take-back. On approval a signed “Change order” PDF is generated and filed under the project's Files (automatically visible to the client), emailed to both parties, and you're notified. Change orders can be edited or deleted before approval; a signed one is locked. You can still book a change order as Approved directly (no client sign-off) when you don't need their signature.
📦 Contents inventory
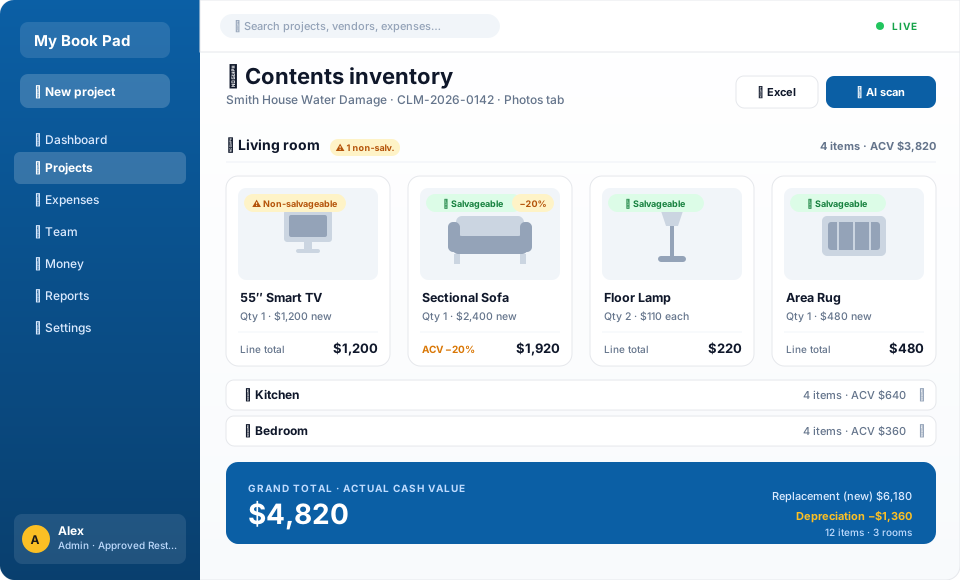
Build a photo catalog of a client's damaged belongings for an insurance contents claim — room by room, item by item, with values, depreciation, and salvage status. Snap a photo and the AI reads the brand and model, prices a replacement, and finds a link to buy it. It all totals to an actual-cash-value figure and exports to Excel or a photos-plus-spreadsheet ZIP. Contents lives in the Photos tab of a project (manager-only).
Cataloguing items
- Add rooms (Living room, Kitchen, Primary bedroom — there's a preset list) so items group where they belong.
- Tap ✨ Scan photo with AI and photograph an item. The AI drafts a description, category, condition, and estimated replacement value, and searches the web for a current price + a buy link — biased to retailers near your business address.
- Review the draft and hit Add, or add items manually. Each item can hold several photos (tap to set the cover), and you can rotate any photo.
Values that match how claims pay
- Replacement value × quantity gives the new-cost line.
- Depreciation % per item drops it to actual cash value (ACV) — the grand total, per-room subtotals, and the client view are all ACV, matching what the policy pays.
- Salvageable vs non-salvageable. Flag whether an item can be cleaned/restored or is a write-off; each room shows a non-salvageable tally.
Sharing & exporting
- Excel. One tidy spreadsheet with rooms, quantities, values, depreciation, ACV, and salvage columns.
- Photos + Excel ZIP. Every item photo foldered by room, plus the spreadsheet — ready to hand an adjuster.
- On the client portal. Turn on Show contents and the homeowner sees a read-only inventory with photos and values. You can also let the client edit specific items (name, description, price, link, notes, condition) so they help build the list — nothing else is exposed.
Example. After a basement flood, Dana photographs a TV, a sofa, and a treadmill. The AI names each, prices replacements, and pulls buy links from Canadian retailers. Dana sets 20% depreciation on the sofa, marks the water-logged treadmill non-salvageable, and exports a photos-plus-Excel ZIP for the adjuster — total contents ACV, itemized, in about five minutes.
🗑 Trash & restore
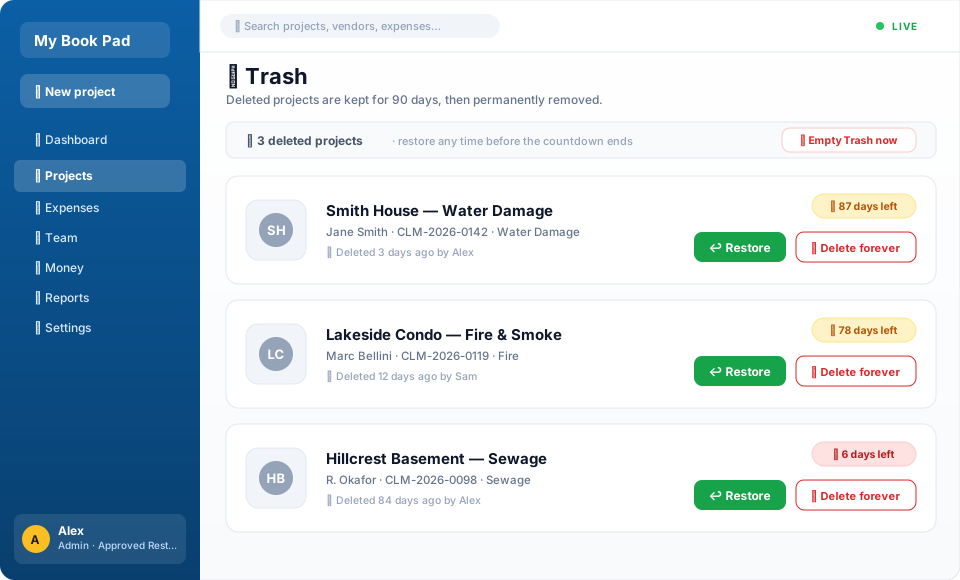
Deleting a project no longer throws anything away. It goes to the Trash, where it's fully recoverable for 90 days — every phase, receipt, photo, note, and payment intact. After 90 days a cleanup pass permanently removes it. An accidental delete is never a disaster.
How it works
- Delete = soft delete. A deleted project (and its whole phase chain) drops out of every list, report, picker, dashboard count, and the client share — as if it were gone — but the data is preserved.
- Trash page. Managers get a Trash view listing every deleted project with who deleted it, when, and how many days are left before it's purged.
- Restore. One click puts the project and all its phases back exactly where they were.
- Delete forever. If you're sure, purge a single project immediately instead of waiting out the 90 days.
Example. Sam deletes the wrong claim during a cleanup. A week later the homeowner calls with a question. Sam opens Trash, sees “Riverside — fire · 83 days left,” hits Restore, and the whole job — receipts, photos, payments — is back in seconds.
💧 Type of loss
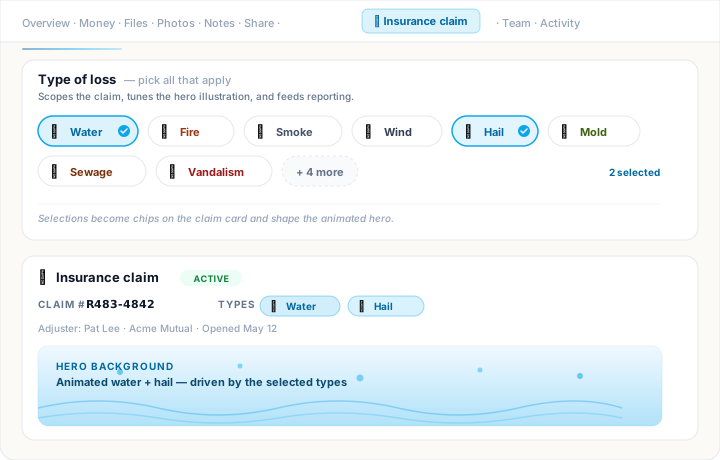
Every insurance claim has a cause — water from a burst pipe, fire from a kitchen grease flare-up, hail through a roof, sewage backup in a basement. The Type of loss picker on the project form lets you tag each claim with one or more of these causes so the right scope, the right reporting, and the right client-facing visuals all line up.
The twelve categories
We picked twelve to cover the bulk of Canadian and American property-restoration work without turning the picker into a thousand-item dropdown. Each one carries its own color and emoji so it's scannable at a glance:
- 💧 Water — burst pipes, dishwasher leaks, supply-line failures, anything that left water somewhere it shouldn't be.
- 🔥 Fire — structural fire damage, charring, heat-related loss.
- 🌫 Smoke — smoke residue and odour, often paired with fire but logged separately when the structural damage is minor and the cleanup is the job.
- 💨 Wind / storm — wind-driven exterior damage, shingles off, fascia torn, downed trees through the roof.
- 🧊 Hail — hail impact on roofs, siding, and exterior glass.
- 🍄 Mold — mold remediation. Usually a follow-on to a water claim but can be its own scope.
- 🚽 Sewage — Category 3 water — sewer backup, septic failure. Different containment rules from a clean-water claim.
- 🔨 Vandalism — break-in damage, graffiti, intentional destruction.
- 🚗 Vehicle impact — car-into-garage, truck-through-storefront, the classic.
- ☣ Biohazard — trauma cleanup and biological contamination.
- ⚠ Asbestos — abatement work. Tagged separately so reports can show how much regulated work you're carrying.
- 📋 Other — anything that doesn't fit cleanly. The note field on the project carries the detail.
Multi-value — one claim, many causes
Real claims rarely fit in one box. A wind-storm tears the roof open and the interior takes a week of water damage before anyone gets up there — that's a wind + water claim, not one or the other. A kitchen fire that fills the house with smoke is fire + smoke. The picker is a multi-select for exactly this reason: tap as many tags as apply and they all stick to the project.
The first tag you tap is the project's primary cause. That distinction only matters when two tags want the same piece of real estate on a screen — for example, both wind and hail have an animated background layer that plays in the top half of the client-share hero. They can't both render at once, so the primary wins and the secondary one rides along in the chip strip.
Tags propagate across the phase chain
A cause-of-loss tag belongs to the claim, not to a single phase. Save a tag on the Emergency phase and the same tags appear on the root project and on Rebuild automatically — the chain stays in sync. Editing tags from any phase updates all of them. Removing a tag everywhere is one click, not three.
Insurance only
Type of loss is an insurance concept. Retail projects (renos, cash jobs, anything not claim-driven) don't show the picker at all — there's no adjuster to report a cause-of-loss to and no insurer-side reporting story. If you ever convert the meaning of a project after the fact, recreate it with the correct project type.
Where the tags show up
- Org-side claim card. A small chip strip sits at the top of the claim card — one chip per tag, color-coded, the primary in the leftmost slot. Hover any chip for the full label.
- Client share hero — meta row. When the share link has Show claim info turned on, the same chip strip rides along the hero meta row beside claim number, insurer, and date of loss. Adjusters see it. Homeowners see it. Hide it for retail-flavoured shares with the toggle.
- Client share hero — animated background. Each type has its own ambient SVG illustration that plays as a background layer behind the hero title. Water rolls along the bottom edge. Fire glows behind the headline. Wind streaks across the top. Hail flecks fall. The motion is subtle — it sets the tone of the page without being a distraction.
- Projects list. A new Any type of loss dropdown sits in the filter row above the Projects table. Pick a cause to scope the list — “show me every water claim still open,” “show every asbestos job from last year.”
- Reports → Cause of loss tab. Counts and dollar totals by category, plus a year-over-year breakdown. Useful for the renewal pitch — “we handled 47 water claims last year, your insureds are in safe hands.”
Walkthrough — Bob tags the Smith Avenue claim
- Bob creates the Smith Avenue project as an Insurance claim. Under Type of loss he taps 💨 Wind / storm first — that's the primary cause, the storm took the roof off.
- Then he taps 💧 Water — by the time the crew tarped the roof, the upstairs ceiling had soaked through.
- He saves. The claim card now shows two chips: Wind (leftmost, primary) and Water. The Rebuild phase, when he adds it later, inherits both tags automatically.
- He opens Client share, ticks Show claim info, and sends the homeowner the link. When the homeowner lands on the share, the hero shows the wind animation behind the title and both chips in the meta row. The cause is obvious before they've read a word.
- At the end of the year, Bob opens Reports → Cause of loss. Wind: 12 claims, $186k. Water: 23 claims, $310k. He takes those numbers into the renewal meeting with his insurer.
Tip. Use Other sparingly. It clears the picker UI but loses the reporting story — an Other-tagged claim won't show up under any specific cause in Reports. If the cause is unusual but namable (lightning strike, falling object, frozen pipes specifically), pick the closest tag and put the detail in the project description. Future-you will thank you when running renewal reports.
📝 Project notes
A per-project running log — adjuster calls, supplement approvals, materials ordered, crew issues, anything that doesn't fit in milestones or expenses. The Notes tab is a private, role-aware log: every note starts internal, and what each teammate sees depends on their role (see Who can see a note below). An Admin or Partner can flip a note onto the client share with one tap. Notes sync across the whole phase chain, so a note logged on Emergency surfaces on Rebuild and vice versa.
Anatomy of a note
- Title — optional, max 120 chars. Shows in the collapsed card header. If left blank, the first ~80 chars of the body fill in as a fallback.
- Body — the actual note text. Can be one line or several paragraphs. Markdown isn't rendered, but line breaks are preserved.
- Phase tag — General, Emergency, or Rebuild. Picked from a pill-shaped dropdown on the composer + edit form. This replaces the author name on the client share view — homeowners and adjusters see “Emergency” or “Rebuild” instead of which team member typed it.
- Client-visible flag — 👁 eye toggle, on each note's header. New notes are always internal — there's no “show on client share” checkbox when you write one. Only an Admin or Partner can later flip a note onto the client share (and only then does the 👁 toggle even appear). When on, the note shows on the client share, provided the share has the “Show notes” section enabled — see below.
Walkthrough — Bob (a Partner) logs an adjuster call and flips it to the client
- Bob opens the Smith Avenue project and switches to the 📝 Notes tab. The composer sits at the top of the section.
- He types a title: “Acme Mutual approved $4,200 supplement.”
- In the body: “Adjuster confirmed the bath repair + drywall supplement today. Updated quote on file. Cheque expected by Friday.”
- Bob picks Rebuild from the Select Phase dropdown — this is rebuild scope. Click + Add note. The note saves internal — there's no client checkbox at create time.
- The note appears as a collapsed card at the top of the list. Because Bob is a Partner, the header carries a 👁 eye toggle. He taps it to push this note to the client share — it flips to a green 👁 ON SHARE pill so Bob can see at a glance which notes are public.
- The next time Alex (homeowner) opens the share link, the note shows up in the Notes section between Phase progress and Documents. The body is collapsed under the title until she taps the card to expand it.
Editing a note in place
Tap the ✎ pencil icon in any note's header. The card swaps — same space — to an editable form with the title, body, and phase dropdown. The Edit button hides; a primary-blue Save button slides into its slot. Save commits, reloads the page back on the Notes tab, and re-collapses the card you were editing so the list stays tidy.
Per-note visibility — fast toggle (Admin / Partner only)
For Admins and Partners, each note row has a small 👁 / 🚫 eye icon in the header. Click it to flip the client-visible flag without entering edit mode. If a note becomes visible AND the project has an active share link with “Show notes” off, the share is automatically flipped to show notes too — you don't have to remember the second toggle. Supervisors and field staff don't see this toggle at all — they can write notes, but only management decides which ones reach a client.
How notes appear on the client share
- Title-first hero. Each note is collapsed behind its title (or body excerpt if no title). Tap the head to expand. Multiple notes can be open at once.
- Phase chip in place of the rep name. General renders slate, Emergency rose, Rebuild brand-blue. Lets the client scan and see which phase each note relates to.
- No timestamps. The client view is a clean “here's what's happening” surface — no “3 days ago” clutter.
- Section-level toggle. On the org-side Share tab, the “📝 Notes” visibility tile turns the whole section on / off without affecting per-note flags.
Who can see a note — notes flow up the chain
The Notes tab is a private log, not a team chat. Notes are written for the people above the author in the chain — a field employee's note is for their supervisors and managers, not for other employees; a manager's note stays private to management. After a note loads, the list is filtered by your role:
- Admin / Partner — see every note on the project, no matter who wrote it.
- Supervisor — see every note except ones written by an Admin or Partner (management notes stay private to management), plus their own. So a supervisor sees employee notes and other supervisors' notes, but not the owners' back-channel.
- Contributor (field employee) — see only their own notes. One employee can't read another employee's notes — they only flow up to a supervisor or manager.
Anyone on a project they can see may write a note. The role filter only affects what you can read back.
Editing & client visibility — who can do what
- Author or Admin — can edit or delete a note. Admins (and Partners) can edit any note; everyone else can edit / delete only their own.
- Client visibility is Admin / Partner only. The 👁 “show on client share” toggle appears solely for management. A supervisor or field employee can write a note but cannot expose one to a client — that decision sits with an Admin or Partner.
Tip. Use phase tags consistently and the client share Notes section becomes a chronological timeline split by phase. Adjusters love it for catching up on what happened between site visits. Homeowners love it for the same reason.
💸 Settle up
The Settle-up page (sidebar nav) has three sections, each answering a different question.
Completed claims — settle them out
The top of the page lists every claim that's ready to close out. A claim lands here automatically once every phase is Completed and Paid in full — or the moment you settle any phase individually (see Settling a phase above). Each card breaks the claim into its phases:
- A phase that's ready shows a green block with each partner's take-back for that phase and its own Settle button — settle them one at a time, or hit Mark as settled to close the whole claim at once.
- Already-settled phases collapse to a muted line; a phase still in progress shows greyed until it's Completed + Paid in full.
- Each phase header links straight to that phase's Money tab.
Once every phase is settled, the claim drops off the board into Recently settled at the bottom, where you can undo if you closed it too soon.
Partners in your workspace
The top section rolls up every internal partner's take-back across every project in your workspace. Same math as the per-project Money tab, summed over all jobs.
Example. At the end of the quarter, Bob's Company has run 4 jobs. The "Partners in your workspace" table shows Bob laid out $2,400 in cash, has $14,300 in profit share, and his take-back is $16,700. Alice's row: $1,100 cash laid out, $9,500 profit share, $10,600 take-back. Combined: $27,300 in cash to distribute between the two of them.
Cross-org partnerships
The bottom section is for money owed between workspaces. For every active partner workspace (Tom's Company in our example), you'll see a card with the net balance:
- You owe Tom's Company $X if his side of shared projects exceeds yours, or
- Tom's Company owes you $X if the opposite, or
- ✓ Square if everything's even.
Each card breaks the balance down per-project so you can see exactly which jobs drove it. Click 💸 Record a payment on the card to log an e-transfer / cheque in either direction. Past settlements live in the Settlement history table at the bottom of the page.
How the cross-org math works
Two rules drive every cross-org calculation:
- The partner always gets reimbursed for their out-of-pocket expenses, in full. Their cash is their cash — your relationship with them comes after that.
- The partner shares only in positive profit. When the project turned a profit, they get their split % of it. When the project is at a loss, the partner gets nothing extra — the source org carries the loss with its internal partners.
So a shared project with Tom's Company at P% split for Tom calculates in two stages:
Stage 1 — between the two workspaces:
- Reimburse Tom for his out-of-pocket expenses on this project (always)
- Total profit = client paid − your expenses − Tom's expenses
- If profit > 0: Tom's profit share = profit × (P / 100). You owe Tom = reimbursement + profit share.
- If profit ≤ 0: Tom's profit share = $0. You owe Tom = reimbursement only.
- Minus any settlements you've already paid in their direction.
- Your org's slice of profit = profit − Tom's share (only when profit > 0)
Stage 2 — between your internal partners:
- Bob & Alice each take their internal-split percentage of your org's slice
- If profit was negative, the full loss sits in your org's slice (Tom doesn't share losses)
Example A — profitable job. Job nets $9,800. Bob's Company shared with Tom's Company at 40% for Tom.
Stage 1: Tom gets $9,800 × 40% = $3,920 (plus reimbursement of whatever he laid out). Your slice = $9,800 − $3,920 = $5,880.
Stage 2: Bob & Alice split $5,880 at 60/40 → Bob $3,528, Alice $2,352.
Example B — at-a-loss / pre-revenue. No client payment yet. Tom has logged $100 of expenses.
Profit = $0 − $0 − $100 = −$100. Profit is negative, so:
You owe Tom = his $100 reimbursement only. No profit share (positive or negative) flows to him.
The $100 loss sits with Bob's Company's internal partners until revenue covers it.
Projects that aren't shared with another workspace skip Stage 1 entirely — the internal partner split applies to the full profit pool, exactly as before.
👥 Team & roles
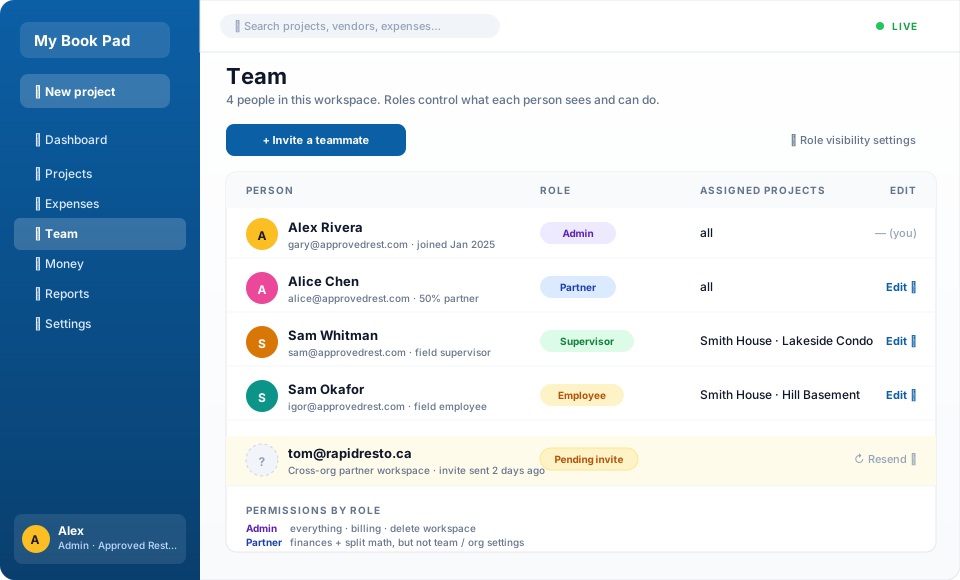
Four roles control what each user sees:
- Admin — sees everything. Adds users, edits org settings, manages partnerships, runs billing.
- Partner — sees finances, runs reports, participates in profit splits and take-back math, but can't edit team or org-level settings.
- Supervisor — sees address + client name + phone on assigned projects. Can log expenses. Doesn't see financials.
- Employee — sees only the jobs they're assigned to. Logs their own expenses. Cannot see other employees' receipts or claim financials.
Example. Bob's Company has Bob (admin), Alice (partner), Marco (employee). Bob and Alice both show up in the ✓ Paid ▾ reimbursement picker and in the Take-back table. Marco doesn't — he's not a partner, he doesn't share profit. Marco logs his own receipts, sees only the jobs Bob assigned him to, and can't see Alice's reimbursement receipts at all.
Per-role visibility
Admin can fine-tune what Supervisor and Employee see in Org Settings → Role visibility. For example, you can let Supervisors see project descriptions but hide adjuster contact info.
Assigning jobs
From a project's detail page, open the Team tab. Pick employees. They'll see the job in their My jobs list on next login.
📊 Reports & tax
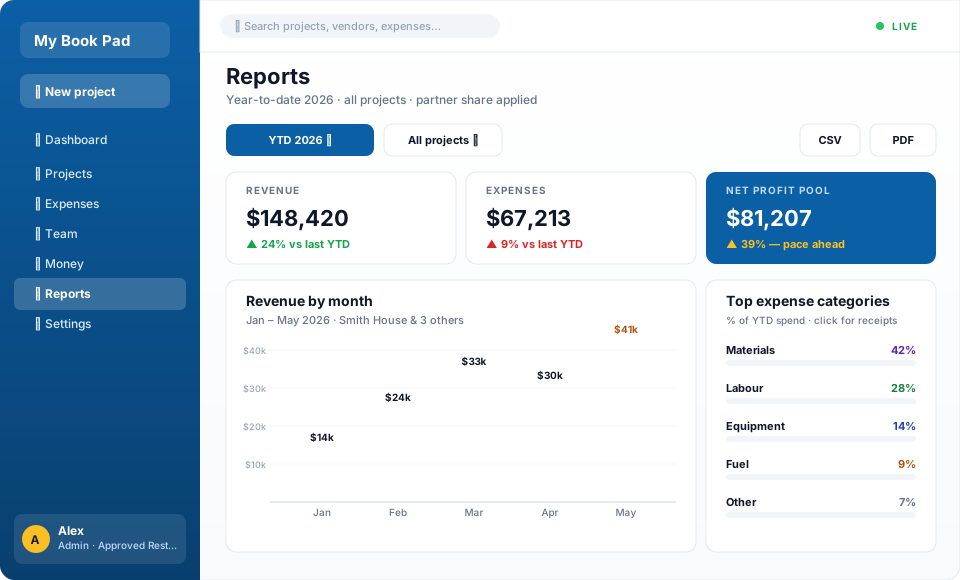
Three views:
- Reports — month-over-month revenue, profit by project, expense trends, settle-up status.
- Tax — every expense for a calendar year, grouped by category, with CSV export. Hand it straight to your accountant.
- Employee expenses — outstanding reimbursements owed to your field staff, per person. Same place where you mark receipts paid via the ✓ Paid ▾ dropdown.
💳 Plans & billing
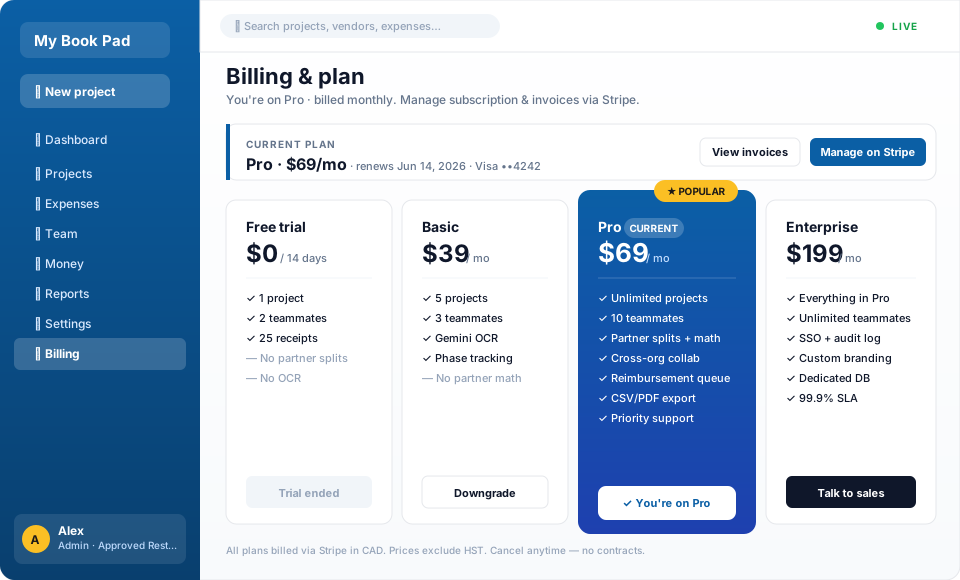
All workspaces start on a 3-month free trial with every feature unlocked. After the trial, you need to subscribe or the workspace becomes read-only (you can still see everything, you just can't add new expenses, payments, or projects).
All prices in US dollars (USD). Billed monthly via Stripe.
| Plan | Price | Projects | Best for |
|---|---|---|---|
| Trial | Free, 3 months | 5 active | Trying the platform |
| Basic | $39 USD / mo | 5 active | Solo operators |
| Pro | $69 USD / mo | 25 active | Growing crews — most popular |
| Enterprise | $199 USD / mo | Unlimited | Large operations |
| Comped | Free, no expiry | Unlimited | Granted by our support team |
Subscribe from Billing in the sidebar. Existing subscribers manage cards / change plans / cancel via the Stripe Customer Portal. Cancellation is immediate — you keep access until the end of the current billing period.
What "Comped" means
Comped is a free unlimited plan granted manually by our support team — usually for partners, early adopters, or organizations we want to support directly. If your workspace is comped, your Billing page shows 🎁 Comped instead of the usual trial/subscription status, and you can't subscribe or be charged from the Subscribe buttons (they're disabled). Email support@mybookpad.com if you think your org should be comped.
💡 Phases of the same claim don't count separately toward your project cap. A 2-phase Emergency + Rebuild claim uses 1 project slot.
⏱ Employee time sheets
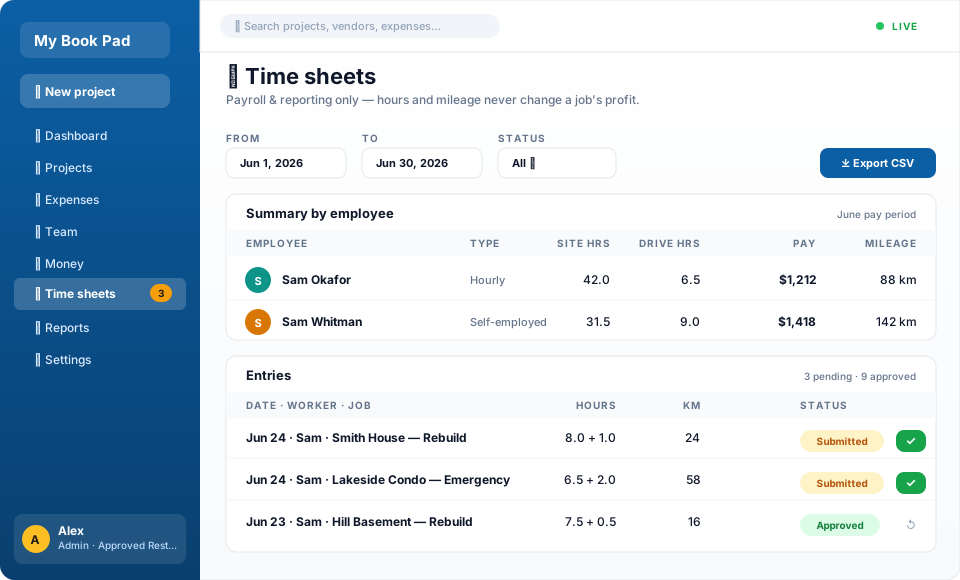
Time sheets track the hours and mileage your team puts into each job, so you can run payroll and hand a clean record to your accountant. They are payroll and reporting only — logging time never touches a job's profit, take-back, or settle-up math. A job's money is still driven entirely by expenses and payments; time sheets sit alongside it.
Who logs time, and where
- Field staff log their own time from a job's Expenses tab — the ⏱ Log my hours card. They pick the phase and day and enter site hours, drive hours, and mileage. These entries arrive as Submitted, waiting for review.
- Managers log for anyone from a job's Team tab — the ⏱ Time sheets card, with a worker picker. Manager-entered rows are auto-approved on the spot.
Approving & exporting
The global Time sheets page (sidebar nav, visible to roles that can see totals) is your review desk. Filter by date range and status, see a per-employee rollup (site hours, drive hours, pay, mileage) plus the underlying entries, and approve / reject / reopen each one. A small amber badge on the sidebar nav counts how many are still pending. When you're ready for payroll, hit Export CSV for an accountant-ready file (it labels each worker as employee vs. self-employed, with no country-specific tax-form names baked in).
Pay types & snapshotted rates
Each person's pay setup lives on their profile under Team: an employment type (hourly, salaried, or self-employed), a default hourly rate, an optional annual salary, and a default mileage rate. When a time entry is logged, the rate and employment type in effect at that moment are snapshotted onto the entry. That means editing someone's rate later only affects future entries — it never rewrites a pay period you've already closed.
Example. Marco (Bob's Company) works a long day on Smith House. From the job's Expenses tab he taps ⏱ Log my hours, picks the Rebuild phase, and enters 8 site hours, 1 drive hour, and 24 km. The row shows as Submitted. Bob opens the Time sheets page, sees Marco's row in the pending list, checks it against the schedule, and hits ✓ Approve. At month-end Bob exports the CSV for his bookkeeper. None of this changes Smith House's profit — it's purely Marco's pay record.
🌍 Currency & units
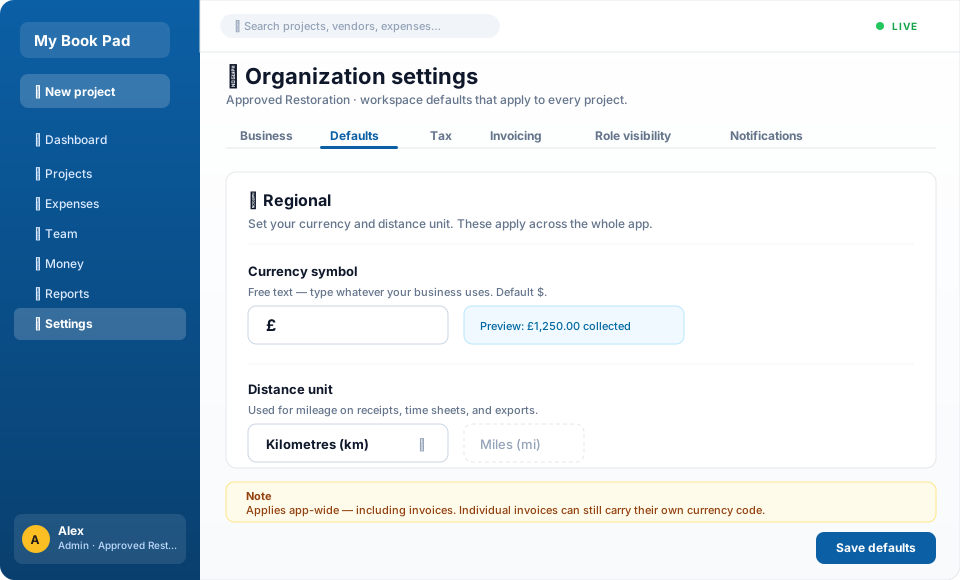
My Book Pad works in whatever currency and distance unit your business uses. Both live under Org Settings → Defaults → 🌍 Regional, and the choice flows through the whole app at once — no per-screen toggles to chase.
Currency symbol
The Currency symbol field is free text — type whatever your business uses ($, £, €, R, anything). It defaults to $. Once set, that symbol prefixes every money value in the app: dashboards, the Money tab, take-back and settle-up, reports, CSV exports, the client share view, and your invoices.
Distance unit (km / mi)
The Distance unit dropdown switches mileage between kilometres and miles. It re-labels every mileage field, placeholder, and CSV header across the app — receipts, the project form, the per-user mileage rate, time sheets, and exports — so a crew in the US sees "mi" everywhere and a crew in Canada sees "km".
Heads-up. The per-invoice currency feature is separate — an individual invoice can still carry its own currency code (handy if you occasionally bill a client abroad). The 🌍 Regional setting is your workspace default, the currency everything else in the app is shown in. (My Book Pad's own subscription prices are always in US dollars, regardless of this setting.)
📱 Mobile apps
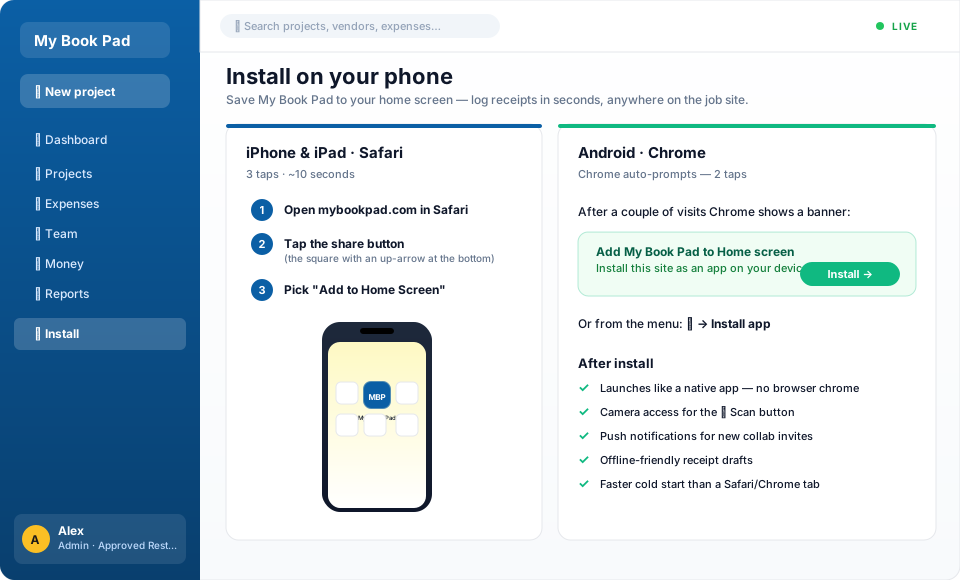
My Book Pad is a free native app on both stores: the App Store for iPhone & iPad, and Google Play for Android. On desktop, just open it in any browser — nothing to install.
👉 Full step-by-step install guide with screenshots →
iPhone & iPad
- Open the App Store — or search My Book Pad.
- Tap Get to install (it's free).
- Open the app and sign in with your mybookpad.com account.
Android
- Open Google Play — or search My Book Pad.
- Tap Install (it's free).
- Open the app and sign in with your mybookpad.com account.
🔔 Notifications & push
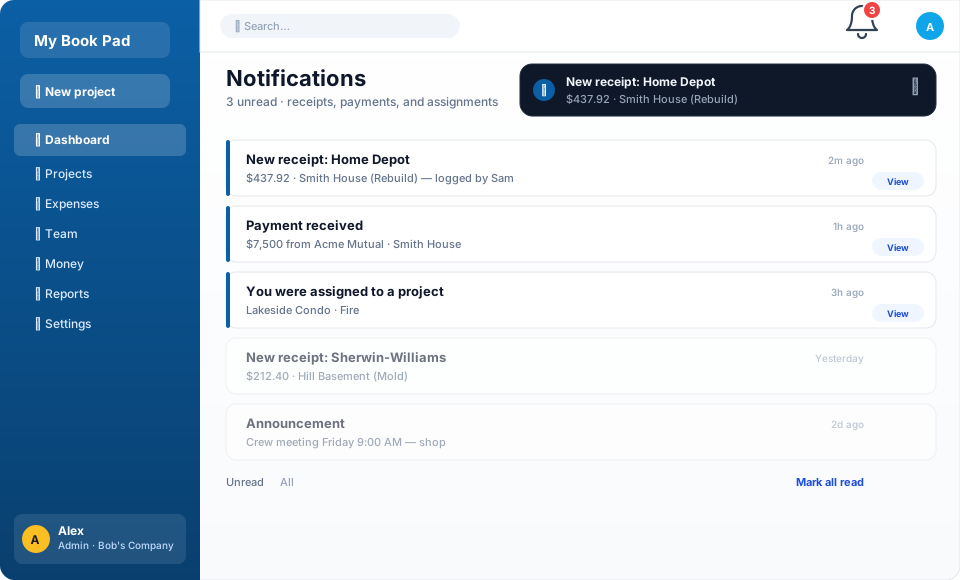
My Book Pad keeps everyone in the loop when something happens on a job — a receipt is logged, a payment lands, or someone's assigned to a project. Every alert shows up in three places, so you never miss one no matter where you are: the bell, an in-app banner, and a push notification on your phone.
The bell & the Notifications page
There's a 🔔 bell in the top bar (top-right, next to search). A red badge shows your unread count. Tap it to open the Notifications page, where every alert is listed newest-first. Switch between Unread and All, mark items read, dismiss them one at a time, or use Mark all read / Clear all. Tapping View on an item jumps straight to the thing it's about — the receipt, the payment, the project — and marks it read.
In-app banners
If a notification arrives while you're inside the app, a banner slides down from the top of the screen for a few seconds. Tap it to jump to the item, or the ✕ to dismiss. Same behavior on the website, the installed PWA, and both phone apps.
Push notifications on your phone
The iPhone and Android apps deliver real push notifications — the kind that pop up even when the app is closed or in the background.
- iPhone (App Store / TestFlight). The first time you sign in, iOS asks permission to send notifications — tap Allow. Alerts then arrive through Apple's push service. Change it anytime in iOS Settings → My Book Pad → Notifications.
- Android (Play Store). Same idea — on first sign-in you're asked to allow notifications (Android 13+). Allow it and pushes arrive as a heads-up banner with sound. Manage it in Settings → Apps → My Book Pad → Notifications.
- Website & installed PWA. The bell, the Notifications page, and the in-app banner all work in any browser and in the home-screen PWA. A browser or PWA that's fully closed won't pop a system notification — that's an app-only feature — but it shows the unread count the next time you open it.
Foreground vs background. When the app is open in front of you, the system pop-up is intentionally suppressed and you get the in-app banner instead. When the app is backgrounded or closed, you get the native pop-up. Either way the bell count updates and the item lands on your Notifications page.
Choosing who gets notified (admins)
Admins control which events fire a push under Org Settings → Notifications:
- Receipt alerts. Tick exactly which admins and partners get pinged when an employee logs a receipt — everyone, a few people, or just you.
- Assignment alerts. Optionally notify an employee when they're assigned to a project, and/or notify partners when an employee is assigned.
- Send a push now. A built-in composer for a one-off message — type a title and body, pick the audience (just you, all admins & partners, all employees, everyone, or one person), and Send. Great for a quick announcement, or to test that push is working on your own device.
Everyone — admins, partners, and employees — gets their own bell and Notifications page. The settings above only decide which events trigger a push.
🔒 Security & privacy
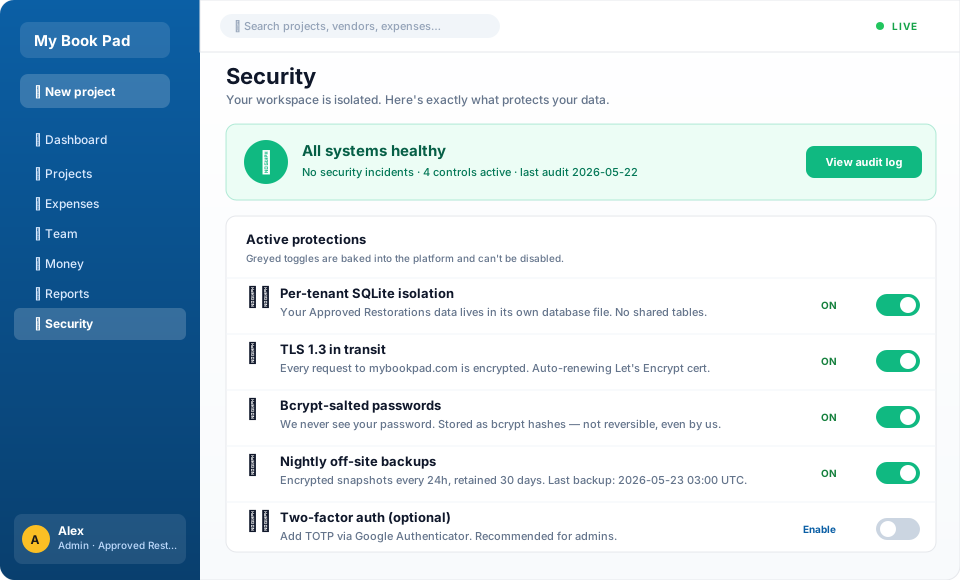
- Per-workspace data isolation. Each workspace has its own SQLite database. No workspace can see another workspace's data (cross-org collab is opt-in via explicit invitations).
- Encrypted in transit. All traffic is HTTPS with valid TLS certs.
- Passwords hashed. bcrypt with per-user salts. We never see your password.
- No ads, no third-party trackers. Your job data is yours.
- Receipt OCR. Receipt photos get sent to Google's Gemini API to extract the text. The photos are not retained by Google after the request and aren't used for training.
- You can export anytime. Most list views have a CSV button.
- You can delete anytime. Org Settings → Danger zone → Delete workspace. Data is kept for 30 days for restore, then permanently deleted.
For the full legal terms see Terms of Service, Privacy Policy, and Cookie Policy.
🎨 Themes & appearance
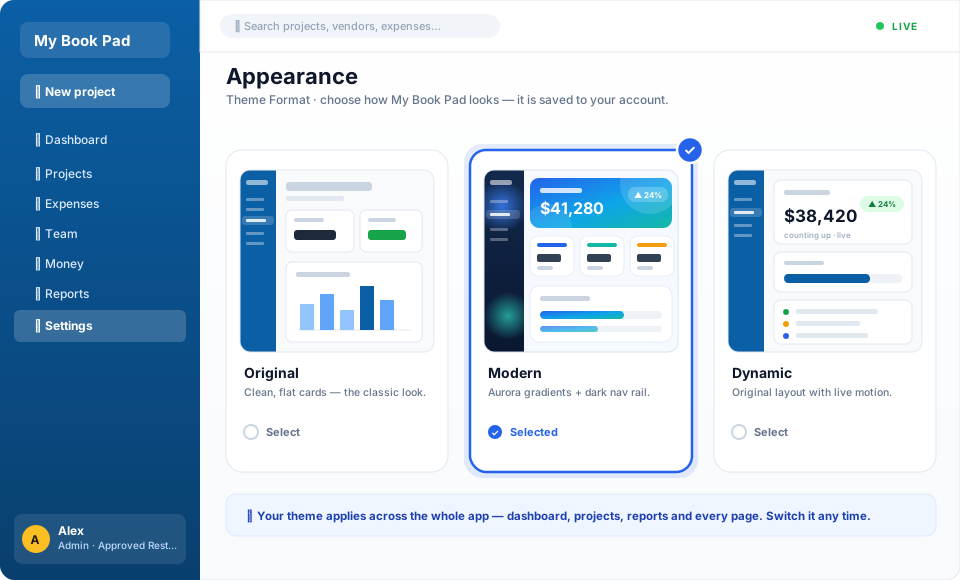
Make the app look the way you like. Each user picks their own Theme Format on the Account page — it applies across the whole app and is remembered on every device you sign in on. There are three looks, plus the usual light/dark toggle on top of any of them.
The three themes
- Original. The clean, lean, no-nonsense layout — fast and familiar.
- Modern. A richer skin over the whole app: aurora-gradient page heroes, rounded stat tiles, a dark aurora sidebar, and polished cards and buttons.
- Dynamic. The Original layout with life added — numbers count up, progress bars grow and shimmer, cards fade in, and page transitions are smooth. Great on the dashboard.
Themes are per-user, so a partner who loves the flashy Modern look and an admin who wants plain-and-fast can share the same workspace and each get their preference. Motion respects your device's “reduce motion” setting, so nothing moves if you've asked your phone or computer to keep things still.
Where. Account → Theme Format. Pick Original, Modern, or Dynamic — it switches instantly.
⚡ Tips & shortcuts
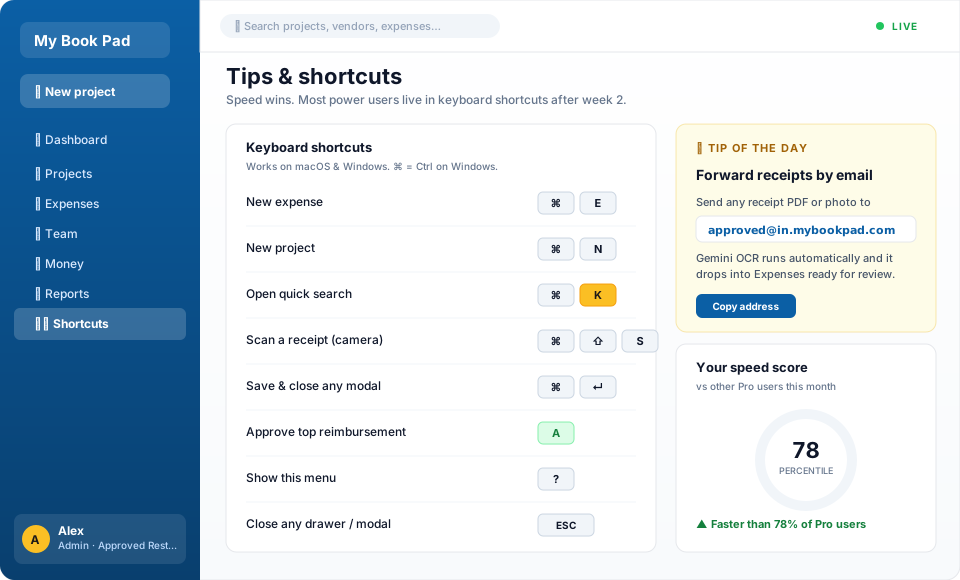
- Install to home screen. Run as a native-feeling app — see the Mobile section above.
- Pin a project. Star a project to keep it at the top of your dashboard.
- Search is global. The Search page matches across clients, projects, vendors, and expenses.
- Clone a project. Open one and use Clone to spin up a copy with the same scope.
- Vendor autocomplete. As you type a vendor in the expense form, past vendors suggest themselves.
- Photo lightbox. Click any receipt or project photo to view it full-screen.
- Bulk reimburse. On Employee Expenses, check several rows, pick the partner who paid, click Mark selected as paid back.
- Hover the "Cash laid out" cell in the take-back table for the own-vs-reimbursed split.
- Long vendor name? The Expenses table ellipsizes anything too wide — hover to see the full name in a tooltip.
- Dark mode. Tap the sun/moon icon in the top-right.
- Multiple workspaces. If your email is on multiple workspaces, the Org Picker shows up after login so you can choose which one to enter.
- Flip a project card. Multi-phase projects on the dashboard have a ▾ Details button at the bottom-right. Click it to flip the card and see per-phase money — front shows the headline, back shows quoted/collected/spent for each phase.
- Click the ⚠ chip on any project card or row to see what needs attention, then dismiss it as a group if it's not actionable.
- Cheque photos. When logging a cheque payment, snap a photo — the amount, date, and cheque # auto-fill via OCR.
❓ FAQ
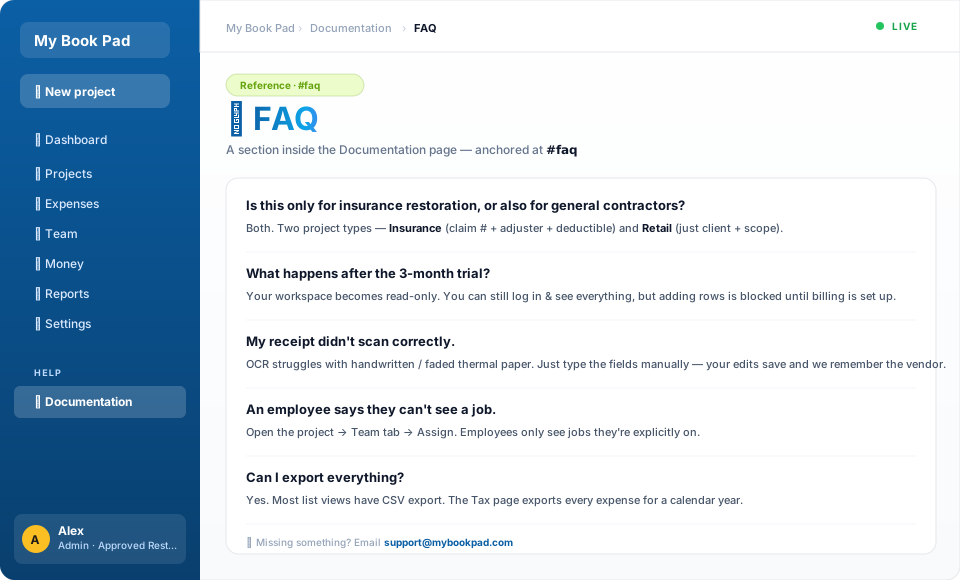
Is this only for insurance restoration, or also for general contractors?
Both. The app's two project types — Insurance (with claim #, adjuster, deductible, date-of-loss) and Retail (just client + address + scope) — cover the two big modes of contractor work. Insurance restoration crews get the Emergency + Rebuild phase model and claim-aware fields; general contractors use Retail projects and skip all the insurance-only fields. Expenses, partners, profit splits, and cross-org collaboration work identically for both.
What happens after the 3-month trial?
If you don't subscribe, your workspace becomes read-only — you can still log in and see everything, but you can't add new expenses, payments, or projects until billing is set up. Your data is kept safely either way for at least 30 days.
Can I switch plans later?
Yes. Go to Billing → Manage subscription. The Stripe Customer Portal lets you upgrade or downgrade. Changes take effect at the next billing period; you're not charged retroactively.
My receipt didn't scan correctly.
The OCR works on most printed receipts but can struggle with handwritten ones, faded thermal paper, or extreme angles. Just type in the fields manually — your edits save.
An employee says they can't see a job.
Check that you've assigned them. Open the project → Team tab → Assign. Employees only see jobs they're explicitly on.
I clicked "Paid" on a receipt but picked the wrong partner. How do I fix it?
Open the row's ✓ Paid ▾ dropdown again. The current partner is shown with a ✓ mark. Click any other partner to switch (the reimbursement date stays the same), or click the red ↺ Revert to outstanding at the top to wipe it entirely.
Why did "Paid in full" not change my Collected number until I refreshed?
It always reloads the page after the click — the new numbers come from the server. If you're sure you clicked but the number didn't move, double-check that the project actually has a Quoted total set (Settings tab → Estimate amount). Without a quoted amount, "Paid in full" has nothing to snap Collected up to.
How do I close out a finished job?
Open the project, change status to Completed, then mark each phase Paid in full as payments come in. Once everything's settled, change status to Archived to remove from your active lists.
I forgot my password.
Use the forgot password link on the sign-in page. We'll email you a reset link valid for 24 hours.
Can I export everything?
Yes. Most list views have CSV export. The Tax page exports every expense for a calendar year.
What if I want to delete my workspace?
Admin only. Go to Org Settings → Danger zone → Delete this workspace. Type your workspace ID to confirm. We keep your data for 30 days in case you change your mind, then permanently delete.
My partner's name shows up in the reimbursement picker even though they're not actively involved. Why?
Anyone with role admin or partner in your workspace shows up in the partner picker, because they're the people who can share profit. If a partner has left, change their role to Employee (or remove them entirely) under Team → edit user. They'll drop off the picker and the Take-back table.
📨 Something missing? Email support@mybookpad.com with what you wish this page covered.